#vue axios post json data
Explore tagged Tumblr posts
Visit Tumblr Blog
Explore Tumblr blogs with no restrictions, modern design and the best experience.
Last Seen Tumblr Blogs


Fun Fact
The Tumblr office adopted Tommy, an 11-year-old Pomeranian.
Text
Vue-js Post request example
Vue-js Post request example
We will Learn the below things in this Blog Article. How we install axios via npm ?How to install node modules ?What is axios ?How to import Axios ?Sending post request via AxiosCompiling assest. we will learn about how we can send post requests by using Axios, if Axios is not present in your comoper.json file then you can use the below command to install the Axios npm install axios Before…

View On WordPress
#axios npm#fetching data from a third party api with vue js and axios#install axios in vue#nuxt axios post example#vue axios cdn#vue axios example#vue axios is not defined#vue axios plugin#vue axios post#vue axios post json data#vue js axios post example#vue js post request example
1 note
·
View note
Photo

hydralisk98′s web projects tracker:
Core principles=
Fail faster
‘Learn, Tweak, Make’ loop
This is meant to be a quick reference for tracking progress made over my various projects, organized by their “ultimate target” goal:
(START)
(Website)=
Install Firefox
Install Chrome
Install Microsoft newest browser
Install Lynx
Learn about contemporary web browsers
Install a very basic text editor
Install Notepad++
Install Nano
Install Powershell
Install Bash
Install Git
Learn HTML
Elements and attributes
Commenting (single line comment, multi-line comment)
Head (title, meta, charset, language, link, style, description, keywords, author, viewport, script, base, url-encode, )
Hyperlinks (local, external, link titles, relative filepaths, absolute filepaths)
Headings (h1-h6, horizontal rules)
Paragraphs (pre, line breaks)
Text formatting (bold, italic, deleted, inserted, subscript, superscript, marked)
Quotations (quote, blockquote, abbreviations, address, cite, bidirectional override)
Entities & symbols (&entity_name, &entity_number,  , useful HTML character entities, diacritical marks, mathematical symbols, greek letters, currency symbols, )
Id (bookmarks)
Classes (select elements, multiple classes, different tags can share same class, )
Blocks & Inlines (div, span)
Computercode (kbd, samp, code, var)
Lists (ordered, unordered, description lists, control list counting, nesting)
Tables (colspan, rowspan, caption, colgroup, thead, tbody, tfoot, th)
Images (src, alt, width, height, animated, link, map, area, usenmap, , picture, picture for format support)
old fashioned audio
old fashioned video
Iframes (URL src, name, target)
Forms (input types, action, method, GET, POST, name, fieldset, accept-charset, autocomplete, enctype, novalidate, target, form elements, input attributes)
URL encode (scheme, prefix, domain, port, path, filename, ascii-encodings)
Learn about oldest web browsers onwards
Learn early HTML versions (doctypes & permitted elements for each version)
Make a 90s-like web page compatible with as much early web formats as possible, earliest web browsers’ compatibility is best here
Learn how to teach HTML5 features to most if not all older browsers
Install Adobe XD
Register a account at Figma
Learn Adobe XD basics
Learn Figma basics
Install Microsoft’s VS Code
Install my Microsoft’s VS Code favorite extensions
Learn HTML5
Semantic elements
Layouts
Graphics (SVG, canvas)
Track
Audio
Video
Embed
APIs (geolocation, drag and drop, local storage, application cache, web workers, server-sent events, )
HTMLShiv for teaching older browsers HTML5
HTML5 style guide and coding conventions (doctype, clean tidy well-formed code, lower case element names, close all html elements, close empty html elements, quote attribute values, image attributes, space and equal signs, avoid long code lines, blank lines, indentation, keep html, keep head, keep body, meta data, viewport, comments, stylesheets, loading JS into html, accessing HTML elements with JS, use lowercase file names, file extensions, index/default)
Learn CSS
Selections
Colors
Fonts
Positioning
Box model
Grid
Flexbox
Custom properties
Transitions
Animate
Make a simple modern static site
Learn responsive design
Viewport
Media queries
Fluid widths
rem units over px
Mobile first
Learn SASS
Variables
Nesting
Conditionals
Functions
Learn about CSS frameworks
Learn Bootstrap
Learn Tailwind CSS
Learn JS
Fundamentals
Document Object Model / DOM
JavaScript Object Notation / JSON
Fetch API
Modern JS (ES6+)
Learn Git
Learn Browser Dev Tools
Learn your VS Code extensions
Learn Emmet
Learn NPM
Learn Yarn
Learn Axios
Learn Webpack
Learn Parcel
Learn basic deployment
Domain registration (Namecheap)
Managed hosting (InMotion, Hostgator, Bluehost)
Static hosting (Nertlify, Github Pages)
SSL certificate
FTP
SFTP
SSH
CLI
Make a fancy front end website about
Make a few Tumblr themes
===You are now a basic front end developer!
Learn about XML dialects
Learn XML
Learn about JS frameworks
Learn jQuery
Learn React
Contex API with Hooks
NEXT
Learn Vue.js
Vuex
NUXT
Learn Svelte
NUXT (Vue)
Learn Gatsby
Learn Gridsome
Learn Typescript
Make a epic front end website about
===You are now a front-end wizard!
Learn Node.js
Express
Nest.js
Koa
Learn Python
Django
Flask
Learn GoLang
Revel
Learn PHP
Laravel
Slim
Symfony
Learn Ruby
Ruby on Rails
Sinatra
Learn SQL
PostgreSQL
MySQL
Learn ORM
Learn ODM
Learn NoSQL
MongoDB
RethinkDB
CouchDB
Learn a cloud database
Firebase, Azure Cloud DB, AWS
Learn a lightweight & cache variant
Redis
SQLlite
NeDB
Learn GraphQL
Learn about CMSes
Learn Wordpress
Learn Drupal
Learn Keystone
Learn Enduro
Learn Contentful
Learn Sanity
Learn Jekyll
Learn about DevOps
Learn NGINX
Learn Apache
Learn Linode
Learn Heroku
Learn Azure
Learn Docker
Learn testing
Learn load balancing
===You are now a good full stack developer
Learn about mobile development
Learn Dart
Learn Flutter
Learn React Native
Learn Nativescript
Learn Ionic
Learn progressive web apps
Learn Electron
Learn JAMstack
Learn serverless architecture
Learn API-first design
Learn data science
Learn machine learning
Learn deep learning
Learn speech recognition
Learn web assembly
===You are now a epic full stack developer
Make a web browser
Make a web server
===You are now a legendary full stack developer
[...]
(Computer system)=
Learn to execute and test your code in a command line interface
Learn to use breakpoints and debuggers
Learn Bash
Learn fish
Learn Zsh
Learn Vim
Learn nano
Learn Notepad++
Learn VS Code
Learn Brackets
Learn Atom
Learn Geany
Learn Neovim
Learn Python
Learn Java?
Learn R
Learn Swift?
Learn Go-lang?
Learn Common Lisp
Learn Clojure (& ClojureScript)
Learn Scheme
Learn C++
Learn C
Learn B
Learn Mesa
Learn Brainfuck
Learn Assembly
Learn Machine Code
Learn how to manage I/O
Make a keypad
Make a keyboard
Make a mouse
Make a light pen
Make a small LCD display
Make a small LED display
Make a teleprinter terminal
Make a medium raster CRT display
Make a small vector CRT display
Make larger LED displays
Make a few CRT displays
Learn how to manage computer memory
Make datasettes
Make a datasette deck
Make floppy disks
Make a floppy drive
Learn how to control data
Learn binary base
Learn hexadecimal base
Learn octal base
Learn registers
Learn timing information
Learn assembly common mnemonics
Learn arithmetic operations
Learn logic operations (AND, OR, XOR, NOT, NAND, NOR, NXOR, IMPLY)
Learn masking
Learn assembly language basics
Learn stack construct’s operations
Learn calling conventions
Learn to use Application Binary Interface or ABI
Learn to make your own ABIs
Learn to use memory maps
Learn to make memory maps
Make a clock
Make a front panel
Make a calculator
Learn about existing instruction sets (Intel, ARM, RISC-V, PIC, AVR, SPARC, MIPS, Intersil 6120, Z80...)
Design a instruction set
Compose a assembler
Compose a disassembler
Compose a emulator
Write a B-derivative programming language (somewhat similar to C)
Write a IPL-derivative programming language (somewhat similar to Lisp and Scheme)
Write a general markup language (like GML, SGML, HTML, XML...)
Write a Turing tarpit (like Brainfuck)
Write a scripting language (like Bash)
Write a database system (like VisiCalc or SQL)
Write a CLI shell (basic operating system like Unix or CP/M)
Write a single-user GUI operating system (like Xerox Star’s Pilot)
Write a multi-user GUI operating system (like Linux)
Write various software utilities for my various OSes
Write various games for my various OSes
Write various niche applications for my various OSes
Implement a awesome model in very large scale integration, like the Commodore CBM-II
Implement a epic model in integrated circuits, like the DEC PDP-15
Implement a modest model in transistor-transistor logic, similar to the DEC PDP-12
Implement a simple model in diode-transistor logic, like the original DEC PDP-8
Implement a simpler model in later vacuum tubes, like the IBM 700 series
Implement simplest model in early vacuum tubes, like the EDSAC
[...]
(Conlang)=
Choose sounds
Choose phonotactics
[...]
(Animation ‘movie’)=
[...]
(Exploration top-down ’racing game’)=
[...]
(Video dictionary)=
[...]
(Grand strategy game)=
[...]
(Telex system)=
[...]
(Pen&paper tabletop game)=
[...]
(Search engine)=
[...]
(Microlearning system)=
[...]
(Alternate planet)=
[...]
(END)
4 notes
·
View notes
Text
Alpine.js: The JavaScript Framework That’s Used Like jQuery, Written Like Vue, and Inspired by TailwindCSS
We have big JavaScript frameworks that tons of people already use and like, including React, Vue, Angular, and Svelte. Do we need another JavaScript library? Let’s take a look at Alpine.js and you can decide for yourself. Alpine.js is for developers who aren’t looking to build a single page application (SPA). It’s lightweight (~7kB gzipped) and designed to write markup-driven client-side JavaScript.
The syntax is borrowed from Vue and Angular directive. That means it will feel familiar if you’ve worked with those before. But, again, Alpine.js is not designed to build SPAs, but rather enhance your templates with a little bit of JavaScript.
For example, here’s an Alpine.js demo of an interactive “alert” component.
CodePen Embed Fallback
The alert message is two-way bound to the input using x-model="msg". The “level” of the alert message is set using a reactive level property. The alert displays when when both msg and level have a value.
It’s like a replacement for jQuery and JavaScript, but with declarative rendering
Alpine.js is a Vue template-flavored replacement for jQuery and vanilla JavaScript rather than a React/Vue/Svelte/WhateverFramework competitor.
Since Alpine.js is less than a year old, it can make assumptions about DOM APIs that jQuery cannot. Let’s briefly draw a comparison between the two.
Querying vs. binding
The bulk of jQuery’s size and features comes in the shape of a cross-browser compatibility layer over imperative DOM APIs — this is usually referred to as jQuery Core and sports features that can query the DOM and manipulate it.
The Alpine.js answer to jQuery core is a declarative way to bind data to the DOM using the x-bind attribute binding directive. It can be used to bind any attribute to reactive data on the Alpine.js component. Alpine.js, like its declarative view library contemporaries (React, Vue), provides x-ref as an escape hatch to directly access DOM elements from JavaScript component code when binding is not sufficient (eg. when integrating a third-party library that needs to be passed a DOM Node).
Handling events
jQuery also provides a way to handle, create and trigger events. Alpine.js provides the x-on directive and the $event magic value which allows JavaScript functions to handle events. To trigger (custom) events, Alpine.js provides the $dispatch magic property which is a thin wrapper over the browser’s Event and Dispatch Event APIs.
Effects
One of jQuery’s key features is its effects, or rather, it’s ability to write easy animations. Where we might use slideUp, slideDown, fadeIn, fadeOut properties in jQuery to create effects, Alpine.js provides a set of x-transition directives, which add and remove classes throughout the element’s transition. That’s largely inspired by the Vue Transition API.
Also, jQuery’s Ajax client has no prescriptive solution in Alpine.js, thanks to the Fetch API or taking advantage of a third party HTTP library (e.g. axios, ky, superagent).
Plugins
It’s also worth calling out jQuery plugins. There is no comparison to that (yet) in the Alpine.js ecosystem. Sharing Alpine.js components is relatively simple, usually requiring a simple case of copy and paste. The JavaScript in Alpine.js components are “just functions” and tend not to access Alpine.js itself, making them relatively straightforward to share by including them on different pages with a script tag. Any magic properties are added when Alpine initializes or is passed into bindings, like $event in x-on bindings.
There are currently no examples of Alpine.js extensions, although there are a few issues and pull requests to add “core” events that hook into Alpine.js from other libraries. There are also discussions happening about the ability to add custom directives. The stance from Alpine.js creator Caleb Porzio, seems to be basing API decisions on the Vue APIs, so I would expect that any future extension point would be inspired on what Vue.js provides.
Size
Alpine.js is lighter weight than jQuery, coming in at 21.9kB minified — 7.1kB gzipped — compared to jQuery at 87.6kB minified — 30.4kB minified and gzipped. Only 23% the size!
Most of that is likely due to the way Alpine.js focuses on providing a declarative API for the DOM (e.g. attribute binding, event listeners and transitions).

Bundlephobia breaks down the two
For the sake of comparison, Vue comes in at 63.5kB minified (22.8kB gzipped). How can Alpine.js come in lighter despite it’s API being equivalent Vue? Alpine.js does not implement a Virtual DOM. Instead, it directly mutates the DOM while exposing the same declarative API as Vue.
Let’s look at an example
Alpine is compact because since application code is declarative in nature, and is declared via templates. For example, here’s a Pokemon search page using Alpine.js:
CodePen Embed Fallback
This example shows how a component is set up using x-data and a function that returns the initial component data, methods, and x-init to run that function on load.
Bindings and event listeners in Alpine.js with a syntax that’s strikingly similar to Vue templates.
Alpine: x-bind:attribute="express" and x-on:eventName="expression", shorthand is :attribute="expression" and @eventName="expression" respectively
Vue: v-bind:attribute="express" and v-on:eventName="expression", shorthand is :attribute="expression" and @eventName="expression" respectively
Rendering lists is achieved with x-for on a template element and conditional rendering with x-if on a template element.
Notice that Alpine.js doesn’t provide a full templating language, so there’s no interpolation syntax (e.g. in Vue.js, Handlebars and AngularJS). Instead, binding dynamic content is done with the x-text and x-html directives (which map directly to underlying calls to Node.innerText and Node.innerHTML).
An equivalent example using jQuery is an exercise you’re welcome to take on, but the classic style includes several steps:
Imperatively bind to the button click using $('button').click(/* callback */).
Within this “click callback” get the input value from the DOM, then use it to call the API.
Once the call has completed, the DOM is updated with new nodes generated from the API response.
If you’re interested in a side by side comparison of the same code in jQuery and Alpine.js, Alex Justesen created the same character counter in jQuery and in Alpine.js.
Back in vogue: HTML-centric tools
Alpine.js takes inspiration from TailwindCSS. The Alpine.js introduction on the repository is as “Tailwind for JavaScript.”
Why is that important?
One of Tailwind’s selling points is that it “provides low-level utility classes that let you build completely custom designs without ever leaving your HTML.” That’s exactly what Alpine does. It works inside HTML so there is no need to work inside of JavaScript templates the way we would in Vue or React Many of the Alpine examples cited in the community don’t even use script tags at all!
Let’s look at one more example to drive the difference home. Here’s is an accessible navigation menu in Alpine.js that uses no script tags whatsoever.
CodePen Embed Fallback
This example leverages aria-labelledby and aria-controls outside of Alpine.js (with id references). Alpine.js makes sure the “toggle” element (which is a button), has an aria-expanded attribute that’s true when the navigation is expanded, and false when it’s collapsed. This aria-expanded binding is also applied to the menu itself and we show/hide the list of links in it by binding to hidden.
Being markup-centric means that Alpine.js and TailwindCSS examples are easy to share. All it takes is a copy-paste into HTML that is also running Alpine.js/TailwindCSS. No crazy directories full of templates that compile and render into HTML!
Since HTML is a fundamental building block of the web, it means that Alpine.js is ideal for augmenting server-rendered (Laravel, Rails, Django) or static sites (Hugo, Hexo, Jekyll). Integrating data with this sort of tooling can be a simple as outputting some JSON into the x-data="{}" binding. The affordance of passing some JSON from your backend/static site template straight into the Alpine.js component avoids building “yet another API endpoint” that simply serves a snippet of data required by a JavaScript widget.
Client-side without the build step
Alpine.js is designed to be used as a direct script include from a public CDN. Its developer experience is tailored for that. That’s why it makes for a great jQuery comparison and replacement: it’s dropped in and eliminates a build step.
While it’s not traditionally used this way, the bundled version of Vue can be linked up directly. Sarah Drasner has an excellent write-up showing examples of jQuery substituted with Vue. However, if you use Vue without a build step, you’re actively opting out of:
the Vue CLI
single file components
smaller/more optimized bundles
a strict CSP (Content Security Policy) since Vue inline templates evaluate expressions client-side
So, yes, while Vue boasts a buildless implementation, its developer experience is really depedent on the Vue CLI. That could be said about Create React App for React, and the Angular CLI. Going build-less strips those frameworks of their best qualities.
There you have it! Alpine.js is a modern, CDN-first library that brings declarative rendering for a small payload — all without the build step and templates that other frameworks require. The result is an HTML-centric approach that not only resembles a modern-day jQuery but is a great substitute for it as well.
If you’re looking for a jQuery replacement that’s not going to force you into a SPAs architecture, then give Alpine.js a go! Interested? You can find out more on Alpine.js Weekly, a free weekly roundup of Alpine.js news and articles.
The post Alpine.js: The JavaScript Framework That’s Used Like jQuery, Written Like Vue, and Inspired by TailwindCSS appeared first on CSS-Tricks.
via CSS-Tricks https://ift.tt/3aMMDvq
0 notes
Text
Alpine.js: The JavaScript Framework That’s Used Like jQuery, Written Like Vue, and Inspired by TailwindCSS
We have big JavaScript frameworks that tons of people already use and like, including React, Vue, Angular, and Svelte. Do we need another JavaScript library? Let’s take a look at Alpine.js and you can decide for yourself. Alpine.js is for developers who aren’t looking to build a single page application (SPA). It’s lightweight (~7kB gzipped) and designed to write markup-driven client-side JavaScript.
The syntax is borrowed from Vue and Angular directive. That means it will feel familiar if you’ve worked with those before. But, again, Alpine.js is not designed to build SPAs, but rather enhance your templates with a little bit of JavaScript.
For example, here’s an Alpine.js demo of an interactive “alert” component.
CodePen Embed Fallback
The alert message is two-way bound to the input using x-model="msg". The “level” of the alert message is set using a reactive level property. The alert displays when when both msg and level have a value.
It’s like a replacement for jQuery and JavaScript, but with declarative rendering
Alpine.js is a Vue template-flavored replacement for jQuery and vanilla JavaScript rather than a React/Vue/Svelte/WhateverFramework competitor.
Since Alpine.js is less than a year old, it can make assumptions about DOM APIs that jQuery cannot. Let’s briefly draw a comparison between the two.
Querying vs. binding
The bulk of jQuery’s size and features comes in the shape of a cross-browser compatibility layer over imperative DOM APIs — this is usually referred to as jQuery Core and sports features that can query the DOM and manipulate it.
The Alpine.js answer to jQuery core is a declarative way to bind data to the DOM using the x-bind attribute binding directive. It can be used to bind any attribute to reactive data on the Alpine.js component. Alpine.js, like its declarative view library contemporaries (React, Vue), provides x-ref as an escape hatch to directly access DOM elements from JavaScript component code when binding is not sufficient (eg. when integrating a third-party library that needs to be passed a DOM Node).
Handling events
jQuery also provides a way to handle, create and trigger events. Alpine.js provides the x-on directive and the $event magic value which allows JavaScript functions to handle events. To trigger (custom) events, Alpine.js provides the $dispatch magic property which is a thin wrapper over the browser’s Event and Dispatch Event APIs.
Effects
One of jQuery’s key features is its effects, or rather, it’s ability to write easy animations. Where we might use slideUp, slideDown, fadeIn, fadeOut properties in jQuery to create effects, Alpine.js provides a set of x-transition directives, which add and remove classes throughout the element’s transition. That’s largely inspired by the Vue Transition API.
Also, jQuery’s Ajax client has no prescriptive solution in Alpine.js, thanks to the Fetch API or taking advantage of a third party HTTP library (e.g. axios, ky, superagent).
Plugins
It’s also worth calling out jQuery plugins. There is no comparison to that (yet) in the Alpine.js ecosystem. Sharing Alpine.js components is relatively simple, usually requiring a simple case of copy and paste. The JavaScript in Alpine.js components are “just functions” and tend not to access Alpine.js itself, making them relatively straightforward to share by including them on different pages with a script tag. Any magic properties are added when Alpine initializes or is passed into bindings, like $event in x-on bindings.
There are currently no examples of Alpine.js extensions, although there are a few issues and pull requests to add “core” events that hook into Alpine.js from other libraries. There are also discussions happening about the ability to add custom directives. The stance from Alpine.js creator Caleb Porzio, seems to be basing API decisions on the Vue APIs, so I would expect that any future extension point would be inspired on what Vue.js provides.
Size
Alpine.js is lighter weight than jQuery, coming in at 21.9kB minified — 7.1kB gzipped — compared to jQuery at 87.6kB minified — 30.4kB minified and gzipped. Only 23% the size!
Most of that is likely due to the way Alpine.js focuses on providing a declarative API for the DOM (e.g. attribute binding, event listeners and transitions).
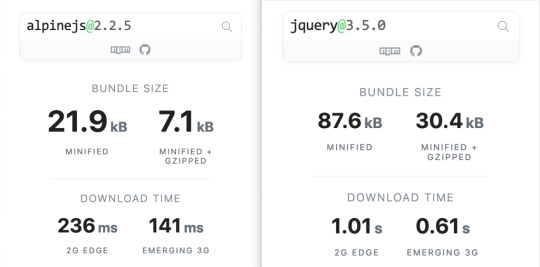
Bundlephobia breaks down the two
For the sake of comparison, Vue comes in at 63.5kB minified (22.8kB gzipped). How can Alpine.js come in lighter despite it’s API being equivalent Vue? Alpine.js does not implement a Virtual DOM. Instead, it directly mutates the DOM while exposing the same declarative API as Vue.
Let’s look at an example
Alpine is compact because since application code is declarative in nature, and is declared via templates. For example, here’s a Pokemon search page using Alpine.js:
CodePen Embed Fallback
This example shows how a component is set up using x-data and a function that returns the initial component data, methods, and x-init to run that function on load.
Bindings and event listeners in Alpine.js with a syntax that’s strikingly similar to Vue templates.
Alpine: x-bind:attribute="express" and x-on:eventName="expression", shorthand is :attribute="expression" and @eventName="expression" respectively
Vue: v-bind:attribute="express" and v-on:eventName="expression", shorthand is :attribute="expression" and @eventName="expression" respectively
Rendering lists is achieved with x-for on a template element and conditional rendering with x-if on a template element.
Notice that Alpine.js doesn’t provide a full templating language, so there’s no interpolation syntax (e.g. in Vue.js, Handlebars and AngularJS). Instead, binding dynamic content is done with the x-text and x-html directives (which map directly to underlying calls to Node.innerText and Node.innerHTML).
An equivalent example using jQuery is an exercise you’re welcome to take on, but the classic style includes several steps:
Imperatively bind to the button click using $('button').click(/* callback */).
Within this “click callback” get the input value from the DOM, then use it to call the API.
Once the call has completed, the DOM is updated with new nodes generated from the API response.
If you’re interested in a side by side comparison of the same code in jQuery and Alpine.js, Alex Justesen created the same character counter in jQuery and in Alpine.js.
Back in vogue: HTML-centric tools
Alpine.js takes inspiration from TailwindCSS. The Alpine.js introduction on the repository is as “Tailwind for JavaScript.”
Why is that important?
One of Tailwind’s selling points is that it “provides low-level utility classes that let you build completely custom designs without ever leaving your HTML.” That’s exactly what Alpine does. It works inside HTML so there is no need to work inside of JavaScript templates the way we would in Vue or React Many of the Alpine examples cited in the community don’t even use script tags at all!
Let’s look at one more example to drive the difference home. Here’s is an accessible navigation menu in Alpine.js that uses no script tags whatsoever.
CodePen Embed Fallback
This example leverages aria-labelledby and aria-controls outside of Alpine.js (with id references). Alpine.js makes sure the “toggle” element (which is a button), has an aria-expanded attribute that’s true when the navigation is expanded, and false when it’s collapsed. This aria-expanded binding is also applied to the menu itself and we show/hide the list of links in it by binding to hidden.
Being markup-centric means that Alpine.js and TailwindCSS examples are easy to share. All it takes is a copy-paste into HTML that is also running Alpine.js/TailwindCSS. No crazy directories full of templates that compile and render into HTML!
Since HTML is a fundamental building block of the web, it means that Alpine.js is ideal for augmenting server-rendered (Laravel, Rails, Django) or static sites (Hugo, Hexo, Jekyll). Integrating data with this sort of tooling can be a simple as outputting some JSON into the x-data="{}" binding. The affordance of passing some JSON from your backend/static site template straight into the Alpine.js component avoids building “yet another API endpoint” that simply serves a snippet of data required by a JavaScript widget.
Client-side without the build step
Alpine.js is designed to be used as a direct script include from a public CDN. Its developer experience is tailored for that. That’s why it makes for a great jQuery comparison and replacement: it’s dropped in and eliminates a build step.
While it’s not traditionally used this way, the bundled version of Vue can be linked up directly. Sarah Drasner has an excellent write-up showing examples of jQuery substituted with Vue. However, if you use Vue without a build step, you’re actively opting out of:
the Vue CLI
single file components
smaller/more optimized bundles
a strict CSP (Content Security Policy) since Vue inline templates evaluate expressions client-side
So, yes, while Vue boasts a buildless implementation, its developer experience is really depedent on the Vue CLI. That could be said about Create React App for React, and the Angular CLI. Going build-less strips those frameworks of their best qualities.
There you have it! Alpine.js is a modern, CDN-first library that brings declarative rendering for a small payload — all without the build step and templates that other frameworks require. The result is an HTML-centric approach that not only resembles a modern-day jQuery but is a great substitute for it as well.
If you’re looking for a jQuery replacement that’s not going to force you into a SPAs architecture, then give Alpine.js a go! Interested? You can find out more on Alpine.js Weekly, a free weekly roundup of Alpine.js news and articles.
The post Alpine.js: The JavaScript Framework That’s Used Like jQuery, Written Like Vue, and Inspired by TailwindCSS appeared first on CSS-Tricks.
Alpine.js: The JavaScript Framework That’s Used Like jQuery, Written Like Vue, and Inspired by TailwindCSS published first on https://deskbysnafu.tumblr.com/
0 notes
Text
Alpine.js: The JavaScript Framework That’s Used Like jQuery, Written Like Vue, and Inspired by TailwindCSS
We have big JavaScript frameworks that tons of people already use and like, including React, Vue, Angular, and Svelte. Do we need another JavaScript library? Let’s take a look at Alpine.js and you can decide for yourself. Alpine.js is for developers who aren’t looking to build a single page application (SPA). It’s lightweight (~7kB gzipped) and designed to write markup-driven client-side JavaScript.
The syntax is borrowed from Vue and Angular directive. That means it will feel familiar if you’ve worked with those before. But, again, Alpine.js is not designed to build SPAs, but rather enhance your templates with a little bit of JavaScript.
For example, here’s an Alpine.js demo of an interactive “alert” component.
CodePen Embed Fallback
The alert message is two-way bound to the input using x-model="msg". The “level” of the alert message is set using a reactive level property. The alert displays when when both msg and level have a value.
It’s like a replacement for jQuery and JavaScript, but with declarative rendering
Alpine.js is a Vue template-flavored replacement for jQuery and vanilla JavaScript rather than a React/Vue/Svelte/WhateverFramework competitor.
Since Alpine.js is less than a year old, it can make assumptions about DOM APIs that jQuery cannot. Let’s briefly draw a comparison between the two.
Querying vs. binding
The bulk of jQuery’s size and features comes in the shape of a cross-browser compatibility layer over imperative DOM APIs — this is usually referred to as jQuery Core and sports features that can query the DOM and manipulate it.
The Alpine.js answer to jQuery core is a declarative way to bind data to the DOM using the x-bind attribute binding directive. It can be used to bind any attribute to reactive data on the Alpine.js component. Alpine.js, like its declarative view library contemporaries (React, Vue), provides x-ref as an escape hatch to directly access DOM elements from JavaScript component code when binding is not sufficient (eg. when integrating a third-party library that needs to be passed a DOM Node).
Handling events
jQuery also provides a way to handle, create and trigger events. Alpine.js provides the x-on directive and the $event magic value which allows JavaScript functions to handle events. To trigger (custom) events, Alpine.js provides the $dispatch magic property which is a thin wrapper over the browser’s Event and Dispatch Event APIs.
Effects
One of jQuery’s key features is its effects, or rather, it’s ability to write easy animations. Where we might use slideUp, slideDown, fadeIn, fadeOut properties in jQuery to create effects, Alpine.js provides a set of x-transition directives, which add and remove classes throughout the element’s transition. That’s largely inspired by the Vue Transition API.
Also, jQuery’s Ajax client has no prescriptive solution in Alpine.js, thanks to the Fetch API or taking advantage of a third party HTTP library (e.g. axios, ky, superagent).
Plugins
It’s also worth calling out jQuery plugins. There is no comparison to that (yet) in the Alpine.js ecosystem. Sharing Alpine.js components is relatively simple, usually requiring a simple case of copy and paste. The JavaScript in Alpine.js components are “just functions” and tend not to access Alpine.js itself, making them relatively straightforward to share by including them on different pages with a script tag. Any magic properties are added when Alpine initializes or is passed into bindings, like $event in x-on bindings.
There are currently no examples of Alpine.js extensions, although there are a few issues and pull requests to add “core” events that hook into Alpine.js from other libraries. There are also discussions happening about the ability to add custom directives. The stance from Alpine.js creator Caleb Porzio, seems to be basing API decisions on the Vue APIs, so I would expect that any future extension point would be inspired on what Vue.js provides.
Size
Alpine.js is lighter weight than jQuery, coming in at 21.9kB minified — 7.1kB gzipped — compared to jQuery at 87.6kB minified — 30.4kB minified and gzipped. Only 23% the size!
Most of that is likely due to the way Alpine.js focuses on providing a declarative API for the DOM (e.g. attribute binding, event listeners and transitions).

Bundlephobia breaks down the two
For the sake of comparison, Vue comes in at 63.5kB minified (22.8kB gzipped). How can Alpine.js come in lighter despite it’s API being equivalent Vue? Alpine.js does not implement a Virtual DOM. Instead, it directly mutates the DOM while exposing the same declarative API as Vue.
Let’s look at an example
Alpine is compact because since application code is declarative in nature, and is declared via templates. For example, here’s a Pokemon search page using Alpine.js:
CodePen Embed Fallback
This example shows how a component is set up using x-data and a function that returns the initial component data, methods, and x-init to run that function on load.
Bindings and event listeners in Alpine.js with a syntax that’s strikingly similar to Vue templates.
Alpine: x-bind:attribute="express" and x-on:eventName="expression", shorthand is :attribute="expression" and @eventName="expression" respectively
Vue: v-bind:attribute="express" and v-on:eventName="expression", shorthand is :attribute="expression" and @eventName="expression" respectively
Rendering lists is achieved with x-for on a template element and conditional rendering with x-if on a template element.
Notice that Alpine.js doesn’t provide a full templating language, so there’s no interpolation syntax (e.g. in Vue.js, Handlebars and AngularJS). Instead, binding dynamic content is done with the x-text and x-html directives (which map directly to underlying calls to Node.innerText and Node.innerHTML).
An equivalent example using jQuery is an exercise you’re welcome to take on, but the classic style includes several steps:
Imperatively bind to the button click using $('button').click(/* callback */).
Within this “click callback” get the input value from the DOM, then use it to call the API.
Once the call has completed, the DOM is updated with new nodes generated from the API response.
If you’re interested in a side by side comparison of the same code in jQuery and Alpine.js, Alex Justesen created the same character counter in jQuery and in Alpine.js.
Back in vogue: HTML-centric tools
Alpine.js takes inspiration from TailwindCSS. The Alpine.js introduction on the repository is as “Tailwind for JavaScript.”
Why is that important?
One of Tailwind’s selling points is that it “provides low-level utility classes that let you build completely custom designs without ever leaving your HTML.” That’s exactly what Alpine does. It works inside HTML so there is no need to work inside of JavaScript templates the way we would in Vue or React Many of the Alpine examples cited in the community don’t even use script tags at all!
Let’s look at one more example to drive the difference home. Here’s is an accessible navigation menu in Alpine.js that uses no script tags whatsoever.
CodePen Embed Fallback
This example leverages aria-labelledby and aria-controls outside of Alpine.js (with id references). Alpine.js makes sure the “toggle” element (which is a button), has an aria-expanded attribute that’s true when the navigation is expanded, and false when it’s collapsed. This aria-expanded binding is also applied to the menu itself and we show/hide the list of links in it by binding to hidden.
Being markup-centric means that Alpine.js and TailwindCSS examples are easy to share. All it takes is a copy-paste into HTML that is also running Alpine.js/TailwindCSS. No crazy directories full of templates that compile and render into HTML!
Since HTML is a fundamental building block of the web, it means that Alpine.js is ideal for augmenting server-rendered (Laravel, Rails, Django) or static sites (Hugo, Hexo, Jekyll). Integrating data with this sort of tooling can be a simple as outputting some JSON into the x-data="{}" binding. The affordance of passing some JSON from your backend/static site template straight into the Alpine.js component avoids building “yet another API endpoint” that simply serves a snippet of data required by a JavaScript widget.
Client-side without the build step
Alpine.js is designed to be used as a direct script include from a public CDN. Its developer experience is tailored for that. That’s why it makes for a great jQuery comparison and replacement: it’s dropped in and eliminates a build step.
While it’s not traditionally used this way, the bundled version of Vue can be linked up directly. Sarah Drasner has an excellent write-up showing examples of jQuery substituted with Vue. However, if you use Vue without a build step, you’re actively opting out of:
the Vue CLI
single file components
smaller/more optimized bundles
a strict CSP (Content Security Policy) since Vue inline templates evaluate expressions client-side
So, yes, while Vue boasts a buildless implementation, its developer experience is really depedent on the Vue CLI. That could be said about Create React App for React, and the Angular CLI. Going build-less strips those frameworks of their best qualities.
There you have it! Alpine.js is a modern, CDN-first library that brings declarative rendering for a small payload — all without the build step and templates that other frameworks require. The result is an HTML-centric approach that not only resembles a modern-day jQuery but is a great substitute for it as well.
If you’re looking for a jQuery replacement that’s not going to force you into a SPAs architecture, then give Alpine.js a go! Interested? You can find out more on Alpine.js Weekly, a free weekly roundup of Alpine.js news and articles.
The post Alpine.js: The JavaScript Framework That’s Used Like jQuery, Written Like Vue, and Inspired by TailwindCSS appeared first on CSS-Tricks.
source https://css-tricks.com/alpine-js-the-javascript-framework-thats-used-like-jquery-written-like-vue-and-inspired-by-tailwindcss/
from WordPress https://ift.tt/2We2Ap8 via IFTTT
0 notes
Text
React Data Layer Series - Part 1
This post is the first part of an 8-part series going in-depth into how to build a robust real-world frontend app data layer. This first post sets the stage for where we’ll be going in the series. The series will start May 20th and one post will be released daily! If you’d like to be notified via email when the series begins, sign up for email updates.
Even though most frontend apps are backed by a web service, building out the data later for such frontend apps is hard. State management libraries are often unopinionated about organizing your data, so you need to decide that for yourself. The state management libraries aren’t always designed with an eye toward accessing data from web services, so setting up that access can take some work. And although browsers now have good support for running apps offline, actually building a real system to do so is fraught with inherent complexity.
Some GraphQL clients such as Apollo have built-in support for both remote and local data, but you still need to make decisions about when and how remote and locally-cached data should interact. If you want to fully escape that complexity, there are a few off-the-shelf data libraries that handle much of this complexity for you—but their features, pricing, and data privacy won’t be a fit for every project.
With all these challenges, how can we efficiently set up robust data layers for our frontend apps? This blog post series is an attempt to answer this question by demonstrating common patterns for building a robust data layer in the context of a React app. The code we’ll build together can be used as the basis for a React/Redux app connecting to a JSON-based web service. The same patterns can be applied in other contexts as well, such as if you’re building an app with a GraphQL client, another frontend framework like Vue, or a native platform. And if you’re considering an off-the-shelf system like Firebase or Realm, these principles will help you evaluate the features they offer and think through any bugs that come up while integrating them.
We’ll apply these principles over the course of building out a project for tracking a list of video games. On the surface, the features couldn’t be simpler: we’ll display a list of video game titles and provide the ability to add additional games. We won’t even be building the ability to edit or delete games! But the apparent simplicity will highlight the depth of complexity under the surface, as we tackle questions like:
How will we organize our data stores?
How will we authenticate to the server? How will we store the access token securely?
How can we store our data offline in the browser? How can we still provide users access to the latest data while online?
Should we allow users to make changes to data while offline? If so, how can we handle this?
This series assumes you have familiarity with modern JavaScript features like:
Array Rest and Spread, and Object Rest/Spread
Arrow functions
Async/Await
Class fields
Destructuring
Object property value shorthands
Promises
If not, the above links go to excellent articles and chapters by Axel Rauschmayer introducing them. Familiarity with modern JavaScript features is an important way to be effective in React development in general and frontend development in particular, so it will be time well spent!
This series also assumes you have a basic familiarity with React, Redux, and connecting to web services (we’ll be using the Axios client library to do so). If not, spend some time with the following guides:
React Docs
Redux Docs
Axios Docs
We’ll also be using the following libraries and formats, but it’s okay if you aren’t familiar with them. You’ll be able to pick up enough about how they work from how we use them in this guide, and you can dive into them more in-depth later as you have need.
The JSON:API format for data interchange.
React Materialize for UI components with a nice look and feel.
Redux Thunk for deferred actions.
Redux Persist to save data offline.
Although I prefer and recommend Firefox for general web browsing, in this guide we’ll be using Google Chrome for some of the features its web developer tools provide when it comes to easily working with service workers for offline purposes.
You’ll also notice that we use the Yarn package manager in place of npm. Yarn connects to the same NPM repository as the npm client; it just provides simpler commands, better performance, and a more predictable use of lock files. We recommend using Yarn for all professional frontend projects.
Why Redux?
React has a lot of different options for state management layers, and Redux isn’t the best choice for everything. Let’s talk through some of the options out there and why you might choose them.
setState() and the useState() hook are built-in to React. We’ll be using these for transient data. One downside is that it’s local to the component, and passing it around the app can get cumbersome.
React Context is an API that was made public in React 16.3 and allows passing data through multiple levels of component.
MobX is a popular state management solution that offers “transparent functional reactive programming,” which is to say that it offers APIs that look like you’re interacting with plain JavaScript objects, but under the hood it’ll kick off reactions to keep your UI in sync.
To learn more about these and many other options, check out a blog post about React State Museum, a project to compare different React state management options.
So why are we going with Redux in this case? A few reasons:
It’s still the most popular state management library in the React ecosystem, so when you do need more than what React provides out of the box, it’s a good choice.
We’re taking advantage of Redux’s centralized data storage to easily persist our data.
Redux’s architecture decouples actions from the changes made to individual items of state (via reducers). As we add more richness to our app like different approaches to offline handling, we will change how reducers work with relatively few changes to the actions dispatched. This is what Redux maintainers mean when they say that if you are only using Redux to make data available globally, you probably didn’t need Redux in the first place. Redux is best when you have benefits to gain from the action/reducer decoupling.
Personally, I have no problem with MobX-style “magic” happening to take care of details under the hood. But one of the advantages of Redux’s explicitness is it can be easier to debug.
Let’s Go
That’s all the introduction we need. Check back on May 20 and we’ll get started creating our app!
React Data Layer Series - Part 1 published first on https://johnellrod.weebly.com/
0 notes
Text
A Lovely Spring View: Spring Boot & Vue.js
It´s time to shed some light on the integration of Vue.js with the popular Java Enterprise framework Spring Boot! Both frameworks are shining stars in their respective domain – but how could they be set up together properly? What is a practical project structure and build process? How does the development work locally and how is the app deployed? Let´s elucidate these questions!
Vue.js looks like a great choice!
I have to admit: I am not a frontend developer! I really like to play around with “backend stuff” like Spring Boot, web and microservices, automating whole infrastructures with Vagrant, Packer, Ansible and Docker – while I just wanted to scale my apps with Spring Cloud, Docker Swarm and Traefik…
But wait! Isn´t there a frontend I need to build from time to time?! Yeah, there aren´t that many occasions, but sometimes I have to get my hands dirty with some JavaScript code.

Especially when you are giving lectures at university and try to digitize some old paper processes with your students. And if you ask our CTO, this “backend developer” thing won´t be around much longer…

Alright then, we need to choose the “right” frontend framework – having nearly no clue. The last web app I built was based on Angular 1 – and it felt like a good choice! I loved the coding experience and after a day of training, I felt able to write awesome frontends… But now it’s two years later and I heard rumors that there was a complete rewrite of Angular (2), a new kid in town from Facebook (React) and lots of ES201x stuff, dependency managers, linters and more. Whew! But if I get my colleagues right, Vue.js isn´t the worst choice! Just take a look at all those posts that have been written in our blog this spring (especially if you need a deeper dive into Vue.js):
Rapid prototyping with Vue.js Vue.js – it’s simple until you make it complicated Vue.js & React – JavaScript UI Frameworks im Vergleich
Also, other projects move from one of the other big frameworks like Angular to Vue.js. Some of the main points are Vue.js’ much flatter learning curve and the higher coding speed compared to Angular and React. And the introduction phrase sounds really great:
Vue (pronounced /vjuː/, like view) is a progressive framework for building user interfaces. Unlike other monolithic frameworks, Vue is designed from the ground up to be incrementally adoptable. The core library is focused on the view layer only, and is very easy to pick up and integrate with other libraries or existing projects.
Project setup
So I think it could be a good idea to invest some time into Vue.js. As you may know, I strive to write quite comprehensible blog posts – you can find every bit inside the example project on GitHub. So let´s have a quick look into the project´s structure. The project uses Maven´s Multi Module capabilities to achieve a clean setup:

The pom.xml in the project´s root folder spring-boot-vuejs therefore contains the two modules backend and frontend:
frontendbackend
Spring Boot 2.0.x backend
The easiest way to create a new Spring Boot app is – as Josh Long really likes to emphasize – start dot spring dot io! Just initialize a Spring Boot app with the Web dependency and place the generated zip´s contents into the backend folder. There are only two things I had to change for the Vue.js integration. First the spring-boot-starter-parent has to move to our parent pom.xml in the root directory.
Second – and this is a key concept of our project setup here – we need to copy the generated HTML, JavaScript & CSS to a resources folder where it can be served by Spring Boot´s embedded Webserver later easily. This could be done with the maven-resources-plugin:
maven-resources-plugincopy Vue.js frontend contentgenerate-resourcescopy-resourcessrc/main/resources/publictrue${project.parent.basedir}/frontend/target/diststatic/index.html
It just takes the results from the frontend build process (placed in /frontend/target/dist) and places them into /backend/src/main/resources/public folder. With this a simple java -jar backend-0.0.1-SNAPSHOT.jar will run our Spring Boot App and serve all the frontend assets. But first of all let´s build a frontend to serve!
Just for later needs we also create a simple RESTful Service in BackendController.java and use the great testing tooling from rest-assured together with Spring Boot to test our services inside the BackendControllerTest.class:
@RunWith(SpringRunner.class) @SpringBootTest( classes = SpringBootVuejsApplication.class, webEnvironment = SpringBootTest.WebEnvironment.RANDOM_PORT ) public class BackendControllerTest { @LocalServerPort private int port; @Test public void saysHello() { when() .get("http://localhost:" + port + "/api/hello") .then() .statusCode(HttpStatus.SC_OK) .assertThat() .body(is(equalTo(BackendController.HELLO_TEXT))); }
Vue.js 2.5.x frontend
If you want to reproduce every step mentioned here, you´ll need a working Node.js installation as a prerequisite. Just use your preferred package manager and install it – like brew install node on a Mac. We´ll also need the Vue.js command line interface vue-cli, which could be installed with the help of npm, the Node.js Package Manager:
npm install --global vue-cli
To initialize a project skeleton for Vue.js, we only have to execute the following inside the frontend directory:
vue init webpack frontend
This command results in some questions that require answers:
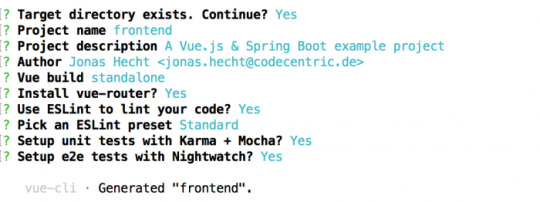
The generated skeleton is a great starting point for your Vue.js experiments. If you want to learn more about installing Vue.js, just head over to the docs.
The frontend-maven-plugin
The easiest way to handle every bit of the quite complex frontend build process with npm, node.js, ESLint, Karma, webpack and so on is to just use the frontend-maven-plugin. If you know Maven, that’s everything you need! Just add the plugin to the frontend’s pom.xml and you can use your well-known Maven commands:
com.github.eirslettfrontend-maven-plugin${frontend-maven-plugin.version}install node and npminstall-node-and-npmv9.11.1npm installnpmgenerate-resourcesinstallnpm run buildnpmrun build
The configuration of the frontend-maven-plugin ensures that the correct Node.js and npm versions are installed – with Node.js version > 4.0.0 the plugin takes care of the corresponding npm version, so you don´t have to explicitly configure it here. Additionally it installs all of our frontend dependencies (via npm install) and runs the full frontend build process with npm run build.
Tell webpack to output build contents to /target
The standard Node.js way is to create a dist directory for builds which contain the minified source code of our web application. But as we use Maven here, we need to have everything in the target directory. Therefore we need to change the generated frontend/config/index.js and replace the following lines:
index: path.resolve(__dirname, '../dist/index.html'), assetsRoot: path.resolve(__dirname, '../dist'),
with
index: path.resolve(__dirname, '../target/dist/index.html'), assetsRoot: path.resolve(__dirname, '../target/dist'),
First app run
Now we already have everything in place to fire up our Spring Boot powered Vue.js application! Just enter the project’s repository and let Maven do its job inside the root spring-boot-vuejs directory:
mvn clean install
This will build our whole app and we can simply do a:
java -jar backend/target/backend-0.0.1-SNAPSHOT.jar
Now let´s open our browser and hit http://localhost:8088/. That´s it, our app should now look like this:

Development process
Although we now have our app successfully running for the first time, we need to take a closer look at how the development process could work with Spring Boot and Vue.js integrated. Because we don´t really want to wait for the full Maven/npm build to complete and wait for our app to be fired up with java -jar until we see a simple frontend element changed in the browser!
We want to get much faster feedback if we change frontend code. Luckily the webpack-dev-server comes to the rescue! This piece of magic will just update and build every change through all the parts of our JavaScript build chain instantly – and is pre-configured in our setup out of the box. The only thing to start the webpack-dev-server is to switch over to the frontend directory and run:
npm run dev
That’s it! Just try it yourself. The command automatically opens your browser. Just enter the Vue.js source in frontend/src and change something. It will instantly be visible
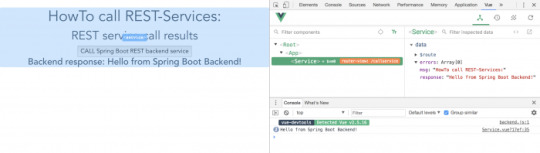
Another neat tool is the Vue.js browser extension. Just install it into your Chrome or Firefox and you should have a deep look into your Vue components inside the Browser´s development tools:
Accessing Spring Boot REST services from Vue.js frontend
As we´re integrating Vue.js with Spring Boot, we for sure want to call some of those nice RESTful web services our Spring Boot backend provides us with. There are many libraries to access web services that one can use with Vue.js. One of them is axios, which is a quite popular Promise API based HTTP client with a huge number of GitHub stars. To use axios in our project, we only have to install the npm dependency:
npm install axios --save
Calling a REST service with Axios is simple. Go into the script area of your component (e.g. in the Service.vue) and add:
import axios from 'axios' data () { return { response: [], errors: [] } }, callRestService () { axios.get(`api/hello`) .then(response => { // JSON responses are automatically parsed. this.response = response.data }) .catch(e => { this.errors.push(e) }) } }
Now inside the template area of your Vue.js component you can request a service call with the callRestService() method – and access the response data accordingly:
CALL Spring Boot REST backend service
Get out of the same-origin policy (SOP) hell
The HTTP calls with axios are working fine – except when we try to use them in our local fast feedback development process with the webpack-dev-server. Why? Because if we start the webpack-dev-server via npm run dev, it will serve our web application on http://localhost:8080. But our Spring Boot REST backend runs on http://localhost:8088! As a core concept of web application security, the same-origin policy (SOP) will then prevent our Vue.js frontend from accessing its Spring Boot backend – resulting in SOP errors.
One way to solve this problem is to use the Cross Origin Resource Sharing Protocol (CORS). Although this isn´t a big deal with both axios and Spring Boot, there´s a much more nifty solution. Thanks to my colleague Daniel who pointed me to the nice proxying feature of webpack-dev-server, we don´t need to configure all the complex CORS stuff!
According to the Vue.js Webpack Template the only thing we need to configure is a Proxy for our webpack-dev-server requests. This can easily be done in the frontend/config/index.js – right inside the dev.proxyTable field:
dev: { ... proxyTable: { // proxy all webpack dev-server requests starting with /api to our Spring Boot backend (localhost:8088) '/api': { target: 'http://localhost:8088', changeOrigin: true } },
With this configuration in place, the webpack-dev-server uses the really handy http-proxy-middleware to proxy all frontend requests with a preceding /api from http://localhost:8080 to http://localhost:8088 – including changing the Origin HTTP header accordingly. Remember that our Spring Boot REST services are configured to serve those requests to /api on class level:
@RestController() @RequestMapping("/api") public class BackendController { @RequestMapping(path = "/hello") public @ResponseBody String sayHello() { return "Hello from Spring Boot Backend!"; }
The proxyTable configuration is finally used in the frontend/build/dev-server.js to configure the proxyMiddleware. We don´t need to change anything here, but I wanted to show the usage of the http-proxy-middleware:
// proxy api requests Object.keys(proxyTable).forEach(function (context) { var options = proxyTable[context] if (typeof options === 'string') { options = { target: options } } app.use(proxyMiddleware(options.filter || context, options)) })
Is the app ready for deployment?
OK, now I can´t really conceal that I love that Continuous Delivery stuff.
So no example project is complete as long as it´s not running anywhere “productively”.
As you may already have found out, the example project has a live deployment configuration for Heroku: With every push into the master branch, our Spring Boot powered Vue.js app is built by TravisCI and deployed to:
https://spring-boot-vuejs.herokuapp.com
In the course of setting up the example project I really fell in love with the great Automatic deploys feature of Heroku and Heroku Pipelines. If the “Wait for CI to pass before deploy” checkbox is selected, we get a fully working pipeline and are able to demonstrate that our example project is also ready for deployment! Thanks again for pointing me to this great platform, Benedikt!
And that´s it!
Now we found a nice way to integrate Vue.js and Spring Boot. As both are really popular frameworks in their respective domain, I hope this introduction is helpful to some of you folks. If you manage to work through all the points shown in this post, you will have a solid project setup that can be used for both local development and deployment – mainly because both Vue.js and Spring Boot bring in such great features. And as “old school” Maven is supported by nearly every platform, this setup is ready for anything you can imagine. Let me know about your great Spring Boot powered Vue.js apps!
Der Beitrag A Lovely Spring View: Spring Boot & Vue.js erschien zuerst auf codecentric AG Blog.
A Lovely Spring View: Spring Boot & Vue.js published first on https://medium.com/@koresol
0 notes
Text
vue安装vue-axios和使用方法
进项目根目录,然后cmd运行
npm install --save axios vue-axios
安装完成后,在main.js中添加
import axios from 'axios'
import VueAxios from 'vue-axios'
Vue.use(VueAxios, axios)
注: vue-axios的源码是按照Vue的插件文档来写的,直接绑在原型链上不是不可以,如果像下面这样注册一个$http,和项目其他成员协作的时候就必须注明你注册的变量名称用来区别不同,而使用vue-axios大家就没有歧义了。说白了,使用vue-axios更多是为了符合规范,并且方便协作吧。
不加载 vue-axios写法如下:
import axios from 'axios'
Vue.prototype.$http = axios
需要使用vue 的prototype注册$http才能用$http
用法:
Vue.axios.get(api)
this.axios.get(api)
this.$http.get(api)
基本使用方法
GET请求
// Make a request for a user with a given ID axios.get('/user?ID=12345') .then(function (response) { console.log(response); }) .catch(function (error) { console.log(error); }); // Optionally the request above could also be done as axios.get('/user', { params: { ID: 12345 } }) .then(function (response) { console.log(response); }) .catch(function (error) { console.log(error); });
POST请求
axios.post('/user', { firstName: 'Fred', lastName: 'Flintstone' }) .then(function (response) { console.log(response); }) .catch(function (error) { console.log(error); });
同时执行多个请求
function getUserAccount() { return axios.get('/user/12345'); } function getUserPermissions() { return axios.get('/user/12345/permissions'); } axios.all([getUserAccount(), getUserPermissions()]) .then(axios.spread(function (acct, perms) { // Both requests are now complete }));
其实和其他的ajax库一样,基本用法都是差不多的。大家一看就知道怎么用。
axios API
可以直接通过config来完成请求 axios(config)
axios({ method: 'post', url: '/user/12345', data: { firstName: 'Fred', lastName: 'Flintstone' } });
axios(url, [config])
// Send a GET request (default method) axios('/user/12345');
请求方法别名
下面是axios支持的所有请求方法别名,便于各种请求。 注:[...]中的数据表示可以为空。url是ajax请求地址;data是提交的数据对象;config是配置对象,所有ajax配置都可以在config中实现。
axios.request(config)
axios.get(url[, config])
axios.delete(url[, config])
axios.head(url[, config])
axios.post(url[, data[, config]])
axios.put(url[, data[, config]])
axios.patch(url[, data[, config]])
并发性
下列接口用于处理并发请求(同时处理多个多个request)
axios.all(iterable)
axios.spread(callback)
axios实例
可以用自定义的config创建一个axios实例 axios.create([config])
var instance = axios.create({ baseURL: 'https://some-domain.com/api/', timeout: 1000, headers: {'X-Custom-Header': 'foobar'} });
实例方法
下面是实例的所有可用方法,方法中的config会与axios实例中的config合并。(实例可以将一些通用的config先配置好)
axios#request(config)
axios#get(url, [config])
axios#delete(url, [config])
axios#head(url, [config])
axios#post(url[, data[, config]])
axios#put(url[, data[, config]])
axios#patch(url[, data[, config]])
Config
重点来了,来看看Config。 下面列出了config的所有配置项,其中之后url是必填的。当method没有指定方法,��认为GET。
{ // `url` is the server URL that will be used for the request // 用来向服务器发送请求的url url: '/user', // `method` is the request method to be used when making the request // 请求方法 method: 'get', // default // `baseURL` will be prepended to `url` unless `url` is absolute. // It can be convenient to set `baseURL` for an instance of axios to pass relative URLs // to methods of that instance. // 假如`url`不是绝对路径,那么向服务器发送请求的URL将是`baseURL + url` baseURL: 'https://some-domain.com/api/', // `transformRequest` allows changes to the request data before it is sent to the server // This is only applicable for request methods 'PUT', 'POST', and 'PATCH' // The last function in the array must return a string, an ArrayBuffer, or a Stream transformRequest: [function (data) { // Do whatever you want to transform the data return data; }], // `transformResponse` allows changes to the response data to be made before // it is passed to then/catch transformResponse: [function (data) { // Do whatever you want to transform the data return data; }], // `headers` are custom headers to be sent headers: {'X-Requested-With': 'XMLHttpRequest'}, // `params` are the URL parameters to be sent with the request // Must be a plain object or a URLSearchParams object params: { ID: 12345 }, // `paramsSerializer` is an optional function in charge of serializing `params` // (e.g. https://www.npmjs.com/package/qs, http://api.jquery.com/jquery.param/) paramsSerializer: function(params) { return Qs.stringify(params, {arrayFormat: 'brackets'}) }, // `data` is the data to be sent as the request body // Only applicable for request methods 'PUT', 'POST', and 'PATCH' // When no `transformRequest` is set, must be of one of the following types: // - string, plain object, ArrayBuffer, ArrayBufferView, URLSearchParams // - Browser only: FormData, File, Blob // - Node only: Stream data: { firstName: 'Fred' }, // `timeout` specifies the number of milliseconds before the request times out. // If the request takes longer than `timeout`, the request will be aborted. timeout: 1000, // `withCredentials` indicates whether or not cross-site Access-Control requests // should be made using credentials withCredentials: false, // default // `adapter` allows custom handling of requests which makes testing easier. // Return a promise and supply a valid response (see [response docs](#response-api)). adapter: function (config) { /* ... */ }, // `auth` indicates that HTTP Basic auth should be used, and supplies credentials. // This will set an `Authorization` header, overwriting any existing // `Authorization` custom headers you have set using `headers`. auth: { username: 'janedoe', password: 's00pers3cret' }, // `responseType` indicates the type of data that the server will respond with // options are 'arraybuffer', 'blob', 'document', 'json', 'text', 'stream' responseType: 'json', // default // `xsrfCookieName` is the name of the cookie to use as a value for xsrf token xsrfCookieName: 'XSRF-TOKEN', // default // `xsrfHeaderName` is the name of the http header that carries the xsrf token value xsrfHeaderName: 'X-XSRF-TOKEN', // default // `onUploadProgress` allows handling of progress events for uploads onUploadProgress: function (progressEvent) { // Do whatever you want with the native progress event }, // `onDownloadProgress` allows handling of progress events for downloads onDownloadProgress: function (progressEvent) { // Do whatever you want with the native progress event }, // `maxContentLength` defines the max size of the http response content allowed maxContentLength: 2000, // `validateStatus` defines whether to resolve or reject the promise for a given // HTTP response status code. If `validateStatus` returns `true` (or is set to `null` // or `undefined`), the promise will be resolved; otherwise, the promise will be // rejected. validateStatus: function (status) { return status >= 200 && status < 300; // default }, // `maxRedirects` defines the maximum number of redirects to follow in node.js. // If set to 0, no redirects will be followed. maxRedirects: 5, // default // `httpAgent` and `httpsAgent` define a custom agent to be used when performing http // and https requests, respectively, in node.js. This allows to configure options like // `keepAlive` that are not enabled by default. httpAgent: new http.Agent({ keepAlive: true }), httpsAgent: new https.Agent({ keepAlive: true }), // 'proxy' defines the hostname and port of the proxy server // `auth` indicates that HTTP Basic auth should be used to connect to the proxy, and supplies credentials. // This will set an `Proxy-Authorization` header, overwriting any existing `Proxy-Authorization` custom headers you have set using `headers`. proxy: { host: '127.0.0.1', port: 9000, auth: : { username: 'mikeymike', password: 'rapunz3l' } }, // `cancelToken` specifies a cancel token that can be used to cancel the request // (see Cancellation section below for details) cancelToken: new CancelToken(function (cancel) { }) }
分析Config
配置参数很多,我们一个一个来了解它们
url —— 用来向服务器发送请求的url
method —— 请求方法,默认是GET方法
baseURL —— 基础URL路径,假如url不是绝对路径,如https://some-domain.com/api/v1/login?name=jack,那么向服务器发送请求的URL将会是baseURL + url。
transformRequest —— transformRequest方法允许在请求发送到服务器之前修改该请求,此方法只适用于PUT、POST和PATCH方法中。而且,此方法最后必须返回一个string、ArrayBuffer或者Stream。
transformResponse —— transformResponse方法允许在数据传递到then/catch之前修改response数据。此方法最后也要返回数据。
headers —— 发送自定义Headers头文件,头文件中包含了http请求的各种信息。
params —— params是发送请求的查询参数对象,对象中的数据会被拼接成url?param1=value1¶m2=value2。
paramsSerializer —— params参数序列化器。
data —— data是在发送POST、PUT或者PATCH请求的数据对象。
timeout —— 请求超时设置,单位为毫秒
withCredentials —— 表明是否有跨域请求需要用到证书
adapter —— adapter允许用户处理更易于测试的请求。返回一个Promise和一个有效的response
auth —— auth表明提供凭证用于完成http的身份验证。这将会在headers中设置一个Authorization授权信息。自定义Authorization授权要设置在headers中。
responseType —— 表示服务器将返回响应的数据类型,有arraybuffer、blob、document、json、text、stream这6个类型,默认是json类似数据。
xsrfCookieName —— 用作 xsrf token 值的 cookie 名称
xsrfHeaderName —— 带有 xsrf token 值 http head 名称
onUploadProgress —— 允许在上传过程中的做一些操作
onDownloadProgress —— 允许在下载过程中的做一些操作
maxContentLength —— 定义了接收到的response响应数据的最大长度。
validateStatus —— validateStatus定义了根据HTTP响应状态码决定是否接收或拒绝获取到的promise。如果 validateStatus 返回 true (或设置为 null 或 undefined ),promise将被接收;否则,promise将被拒绝。
maxRedirects —— maxRedirects定义了在node.js中redirect的最大值,如果设置为0,则没有redirect。
httpAgent —— 定义在使用http请求时的代理
httpsAgent —— 定义在使用https请求时的代理
proxy —— proxy定义代理服务器的主机名和端口,auth
cancelToken —— cancelToken定义一个 cancel token 用于取消请求
Response
当我们ajax获取数据成功后会返回一个response对象,它包含了以下内容:
{ // `data` is the response that was provided by the server data: {}, // `status` is the HTTP status code from the server response status: 200, // `statusText` is the HTTP status message from the server response statusText: 'OK', // `headers` the headers that the server responded with headers: {}, // `config` is the config that was provided to `axios` for the request config: {} }
response是通过promise的then方法来获取,具体使用方法如下:
axios.get('/user/12345') .then(function(response) { console.log(response.data); console.log(response.status); console.log(response.statusText); console.log(response.headers); console.log(response.config); });
相对的,我们有时也会出现ajax报错,此时就会到我们的catch中去捕获异常error对象。
0 notes
Photo

New Post has been published on http://programmingbiters.com/vue-js%e2%80%8a-%e2%80%8asetting-up-auth0/
Vue.js — Setting up Auth0
There are many choices for handling security in applications. For me, offloading the details of username / password storage, change password workflows, new user signups, etc makes my app development less complicated. The team at Auth0 have done an incredible job of creating tools that allow you as a developer to add best in class security to your apps with ease. Building on the previous project, let’s setup Auth0 in the app and create a basic login page.
You will need to create an account with Auth0. Once you have your account, create a new client by clicking on the clients menu and then the new client button. That will give you a screen to name the client and choose a project type.
Auth0 — create new client
Once you click create it will take you to a quick start page where you can choose your framework and they will provide a setup guide. This will guide you thru adding the Auth0 to your app using the lock widget. I am going to be using the base Auth0 script and custom login page for this project. The lock widget is a great tool to get up and running quickly and the guide will be the best resource for using it. The main difference will be the login box, the guide will use the lock widget and I will provide a custom form … either one will process the request in a similar manner.
In the Auth0 client dashboard, select the settings tab. This is where you will find your domain and client id. These values will be needed later when making api calls via the Auth0 script. You will also need to set the allowed callback url. For development it will be http://localhost:8080 (if you are using the vue-cli and have not changed the port).
Be sure to click the save settings button at the bottom. You will also want to add a user for testing. Click on the users menu option on the left and then the create user button. Enter the details and click the save button.
Next, let’s add Auth0 to the app. There are several ways to install the package, I will be linking to it via the cdn. In the index.html, add the following line:
<!-- Auth0 --> <script src="https://cdn.auth0.com/w2/auth0-7.4.min.js"></script>
Setup auth.js
Create a file in the root of /src named auth.js. The auth logic for the entire app will be housed here. First, create an instance of Auth0.
/* eslint no-undef: "off" */ const auth0 = new Auth0( domain: 'YOUR DOMAIN', clientID: 'YOUR CLIENT ID', responseType: 'token', callbackURL: window.location.origin + '/' )
You will need to enter your domain and client id details from the settings tab in the Auth0 dashboard. If you used the webpack template from the vue-cli there are config files where you can set these details and point to them via process.env.variable_name, check out the documentation here.
This file will export 4 helper functions that we can use throughout our app:
login / logout / checkAuth / requireAuth
// login let login = (username, password) => auth0.login( connection: 'Username-Password-Authentication', responseType: 'token', email: username, password: password, scope: 'openid email' , function (err) if (err) alert('something went wrong: ' + err.message) )
The login function calls Auth0.login and passes it a config object. Auth0 provides multiple connections for social and enterprise logins but here I am using the username password connection. The response type is set to token indicating that we want to use a JWT (json web token) for our security strategy. The scope variable tells auth0 the details to be encoded in the jwt, depending on your backend api you might need to add additional data to identify the user on the api side.
// logout let logout = () => localStorage.removeItem('id_token') localStorage.removeItem('profile')
The logout function simply removes the id_token and profile items from local storage. These values are set when the login call is successful (more on that shortly).
// checkAuth let checkAuth = () => if (localStorage.getItem('id_token')) return true else return false
The checkAuth function simply returns true if there is value in the local store with and id of ‘id_token”. For a production app you could consider decoding the token and checking to make sure the value is a jwt token and has not expired. Auth0 offers a jwt-decode library that will aid in this. This library will not validate your token (that happens on the server side) but it can be used to help confirm the token.
// requireAuth let requireAuth = (to, from, next) => if (!checkAuth()) console.log('auth failed ...') let path = '/login' let result = auth0.parseHash(window.location.hash) if (result && result.idToken) // set token in local storage localStorage.setItem('id_token', result.idToken)
// redirect to home page path = '/'
// get user profile data auth0.getProfile(result.idToken, function (err, profile) if (err) // handle error alert(err) let user = JSON.stringify(profile) localStorage.setItem('profile', user) ) next( path: path ) else next()
This function is called from the router beforeEnter hook, it receives a to and from variable and callback variable named next. This allows you a chance to validate the route before the component is loaded. First we call the checkAuth function, if it passes we simply call the next() callback and let things continue on.
If the auth fails, we check the url for a hash and token. The Auth0 service is configured by default to use the re-direct method, so the whole app gets redirected back to the callback url in the Auth0 config. Since this beforeEnter hook is set on our home route, we can check it for the hash and token and set them to our local storage. We also grab the user profile and set that in local storage. One last thing to note in the function, I have variable named path that defaults to /login. If the url has a hash and token, I reset the path the take the user back home (you could also send the redirectUrl to Auth0 and take the user back where they were, for simplicity I am sending back them back to the home page). If the there was no hash or token and the checkAuth failed, the user will be taken to the login page.
Finally, export the functions:
export default checkAuth, login, logout, requireAuth
Create login container
Now that we have our auth logic setup, let’s create a simple login page. Under the containers folder, add a new file named Login.vue.
<template> <div id="login"> <div class="columns"> <div class="column is-one-quarter"> <form @submit.prevent="login"> <p class="control"> <input class="input" v-model="email" placeholder="email"> </p> <p class="control"> <input class="input" v-model="pass" placeholder="password" type="password"> </p> <p> <button class="button" type="submit">Login</button> </p> </form> </div> </div> </div> </template>
<script> import auth from '../auth'
export default name: 'login', data () return email: '', pass: '' , methods: login () auth.login(this.email, this.pass) </script>
Here I am using a simple form with inputs bound via v-model. When the form is submitted, the login method simply passes the inputs to the auth login function.
Adjusting the router
Let’s make some adjustments to the router instance to call the requireAuth function in the beforeEnter hook.
import Vue from 'vue' import Router from 'vue-router'
Vue.use(Router)
import login from './containers/Login' import home from './containers/Home' import dashboard from './containers/dashboard' import projects from './containers/projects' import auth from './auth'
// application routes const routes = [ path: '/login', component: login , path: '/', component: home, beforeEnter: auth.requireAuth , path: '/dashboard', component: dashboard, beforeEnter: auth.requireAuth , path: '/projects', component: projects, beforeEnter: auth.requireAuth ]
// export router instance export default new Router( mode: 'history', routes, linkActiveClass: 'is-active' )
Adjust the navbar
Next, the navbar needs to be updated wiring up the logout button and only showing if the user is logged in. In the navbar.vue component, add the following methods:
methods: logout () auth.logout() this.$router.go('/login') , isLoggedIn () return auth.checkAuth()
Make sure to import the auth file: import auth from ‘../auth’
Setup the click event on the button:
<a class="button" @click="logout()">Logout</a>
and finally add a v-if to the top level of the nav:
<nav class="nav has-shadow" v-if="isLoggedIn()">
Authorization headers in api calls
Now that our app is setup to authenticate our users, the app needs to send the token to our api when making secure calls. To make this work, I will set an authorization header on the default header object in axios.
Head back into the auth.js file, and in the section where it sets the token in local storage add the following line:
// set auth headers axios.defaults.headers.common['Authorization'] = 'Bearer ' + localStorage.getItem('id_token')
This adds the authorization header to every api call made with axios. In addition to setting the value when the auth token gets set, it needs to get set when the app loads (if there is a token). Add the following lines in the auth.js file, outside of the functions:
// set auth header on start up if token is present if (localStorage.getItem('id_token')) axios.defaults.headers.common['Authorization'] = 'Bearer ' + localStorage.getItem('id_token')
Response interceptor
The last item to add to make it secure is to create a response interceptor that will logout our user if an authorized call is returned. In the main.js file, add the following:
import auth from './auth' import axios from 'axios'
axios.interceptors.response.use((response) => return response , function (error) // Do something with response error if (error.response.status === 401) console.log('unauthorized, logging out ...') auth.logout() router.replace('/login') return Promise.reject(error) )
If the response returns and error and it’s 401, call auth.logout(). The user will then get re-directed to the login page.
Server side check
Just to ensure our auth is working, let’s create a simple express server to test it. Create folder named server and add a file named app.js. You will need to install express, express-jwt and cors. Cors is needed since we are going to run the express server on a different port.
$ yarn add express express-jwt cors --dev
OR
$ npm install express express-jwt cors --save --dev
I added the dev flag on the above statement to ensure these are development only dependencies. Add the following code to the server/app.js file:
var express = require('express') var app = express() var cors = require('cors') var jwt = require('express-jwt')
var jwtCheck = jwt( secret: 'YOUR_CLIENT_SECRECT', audience: 'YOUR_CLIENT_ID' )
app.use(cors())
// check security for anything under the secured route app.use('/secured', jwtCheck)
// open call app.get('/ping', function(req, res) res.send("All good. You don't need to be authenticated to call this"); )
// secured call app.get('/secured/ping', function(req, res) res.status(200).send("All good. You only get this message if you're authenticated"); )
app.listen(3000, function () console.log('Example app listening on port 3000!') )
Here I created a simple express server that has 2 routes. The /ping route is un-secured and can be called by anyone. Any path under /secured will get processed thru the jwtCheck function and a valid token must be sent in the header of the request. So if I call /secured/ping I will need to provide a valid token to get a response.
You will need to supply the jwtCheck function 2 variables: secret and audience. The audience is your client id from your client dashboard in Auth0 and the secret is the client secret from the same screen. For a more complete server backend example, check out the Auth0 express example repo here.
Back in the client side of our app, let’s make the final adjustments to test our app. In the main.js file, add the following line to set the baseUrl for axios.
axios.defaults.baseURL = 'http://localhost:3000'
Then in home.vue add a button to call the secured api:
<button type="button" class="button" v-on:click="testSecured()">Test API - Secured</button>
methods: testSecured: function () console.log('sending secured test call to api ...') axios.get('/secured/ping').then((response) => console.log(response) , (response) => console.log(response) )
Run the app and start the node server [ node server/app.js ], login and test to make sure you can make authenticated calls. The button will log the response to the console:
example secured api call
Conclusion
Now that we have secured we can take the next steps to building out the rest of our screens and functionality. In my next post I will cover setting up vuex and using it to store the user profile data. I will also use to manage the state of our projects page.
0 notes
Text
Websockets and stuff.
I've been thinking about how to handle writing a timeline-type feature for UKBlabberbox for the last 3 or 4 years.
I know the back-end of it will be processing posts and comments through PHP and I've got that down. However, the front-end is what I'm unsure about. I had previously used jQuery to prototype it but the problem with that is when you have a link to interact with jQuery (such as clicking a "Like" button), it fails. This is because jQuery only works with events already in the HTML DOM when the page is first loaded.
This is a pain and needs a better solution. I tried out ReactJS by Facebook. It seems to be a very powerful little library but I have trouble getting it work (I am not a javascript programmer). I have also trie out VueJS as it comes already bundled with Laravel which is the PHP Framework I use for UKBlabberbox (the logic behind that choice would be a whole other post). VueJS is nice. It has a clean syntax and I like how seperate components can be in seperate files and that you can map different components to different instances. So I chose VueJS.
Next thing that is needed is a way to inform the user that they have new posts to view from their friends. With jQuery, I used setTimeout("updateTimeline", 10000) to refresh the feed. I think you see the problem here. Imagine being scrolled down 50 tweets on Twitter and suddenly you're back at the top because the feed refreshed. It was annoying, hacky and badly designed. Requiring the user to refresh the page to see new posts is also out because this is 2017. Not 2008 MySpace or Bebo. How to solve this problem? Well, I considered using websockets with NodeJS.
I decided against that as I don't know too much about how they work. I had heard of Pusher via Laravel which has some Pusher stuff bootstrapped in. I tried Pusher out this morning and was sending events to Pusher from php artisan tinker and Pusher was broadcasting those and (while using the demo javascript Pusher generates for you) was picking up that something had changed and updated the page with the data I was entering via tinker. I think we're one step closer.
However, I noticed via the browser console that Pusher uses websockets so my thoughts are now running along the lines of this: (massively simplified)
UserBob posts status "Just seen the new movie. Very good! 5/7"
UserBob presses "Submit"
jQuery detects a status form has been submitted and passes it off to axios
Axios hands that off to the PHP backend which validates the data and stuffs it into the database.
PHP then checks a list of UserBobs friends and wraps their uuids in a json object and fires off a PHP event to broadcast that to the websocket channel user.timeline.{uuid} which then pushes it to Vue which is listening to that channel and sends a nice little update to the DOM saying "There is|are 1/n new post|posts" wrapped up in a <div id="newPostsAvailable"></div>
UserEmma clicks on the div and jQuery pings off axios to grab the posts, returns them as a json object and passes the object to Vue which formats the posts and inserts them into the DOM and, as they say, "bob's your uncle".
The only drawback to this process I can think of is that I have to write a lot of javascript which I dread doing however, axios and Vue are very nice libraries to work with.
If you read all of this then please, help yourself to a Christmas Cookie.
Peace and turkey grease,
Sketch
0 notes
Text
Stay DRY Using axios for API Requests
HTTP requests are a crucial part of any web application that’s communicating with a back-end server. The front end needs some data, so it asks for it via a network HTTP request (or Ajax, as it tends to be called), and the server returns an answer. Almost every website these days does this in some fashion.
With a larger site, we can expect to see more of this. More data, more APIs, and more special circumstances. As sites grow like this, it is important to stay organized. One classic concept is DRY (short for Don’t Repeat Yourself), which is the process of abstracting code to prevent repeating it over and over. This is ideal because it often allows us to write something once, use it in multiple places, and update in a single place rather than each instance.
We might also reach for libraries to help us. For Ajax, axios is a popular choice. You might already be familiar with it, and even use it for things like independent POST and GET requests while developing.
Installation and the basics
It can be installed using npm (or yarn):
npm install axios
An independent POST request using Axios looks like this:
axios.post('https://axios-app.firebaseio.com/users.json', formData) .then(res => console.log(res)) .catch(error => console.log(error))
Native JavaScript has multiple ways of doing JavaScript too. Notably, fetch(). So why use a library at all? Well, for one, error handling in fetch is pretty wonky. You’ll have a better time with axios right out of the gate with that. If you’d like to see a comparison, we have an article that covers both and an article that talks about the value of abstraction with stuff like this.
Another reason to reach for axios? It gives us more opportunities for DRYness, so let’s look into that.
Global config
We can set up a global configuration (e.g. in our main.js file) that handles all application requests using a standard configuration that is set through a default object that ships with axios.
This object contains:
baseURL: A relative URL that acts as a prefix to all requests, and each request can append the URL
headers: Custom headers that can be set based on the requests
timeout: The point at which the request is aborted, usually measured in milliseconds. The default value is 0, meaning it’s not applicable.
withCredentials: Indicates whether or not cross-site Access-Control requests should be made using credentials. The default is false.
responseType: Indicates the type of data that the server will return, with options including json (default), arraybuffer, document, text, and stream.
responseEncoding: Indicates encoding to use for decoding responses. The default value is utf8.
xsrfCookieName: The name of the cookie to use as a value for XSRF token, the default value is XSRF-TOKEN.
xsrfHeaderName: The name of the HTTP header that carries the XSRF token value. The default value is X-XSRF-TOKEN.
maxContentLength: Defines the max size of the HTTP response content in bytes allowed
maxBodyLength: Defines the max size of the HTTP request content in bytes allowed
Most of time, you’ll only be using baseURL, header, and maybe timeout. The rest of them are less frequently needed as they have smart defaults, but it’s nice to know there are there in case you need to fix up requests.
This is the DRYness at work. For each request, we don’t have to repeat the baseURL of our API or repeat important headers that we might need on every request.
Here’s an example where our API has a base, but it also has multiple different endpoints. First, we set up some defaults:
/ main.js import axios from 'axios';
axios.defaults.baseURL = 'https://axios-app.firebaseio.com' // the prefix of the URL axios.defaults.headers.get['Accept'] = 'application.json' // default header for all get request axios.defaults.headers.post['Accept'] = 'application.json' // default header for all POST request
Then, in a component, we can use axios more succinctly, not needing to set those headers, but still having an opportunity to customize the final URL endpoint:
// form.js component import axios from 'axios';
export default { methods : { onSubmit () { // The URL is now https://axios-app.firebaseio.com/users.json axios.post('/users.json', formData) .then(res => console.log(res)) .catch(error => console.log(error)) } } }
Note: This example is in Vue, but the concept extends to any JavaScript situation.
Custom instance
Setting up a “custom instance” is similar to a global config, but scoped to specified components. So, it’s still a DRY technique, but with hierarchy.
We’ll set up our custom instance in a new file (let’s call it authAxios.js) and import it into the “concern” components.
// authAxios.js import axios from 'axios'
const customInstance = axios.create ({ baseURL : 'https://axios-app.firebaseio.com' }) customInstance.defaults.headers.post['Accept'] = 'application.json'
// Or like this...
const customInstance = axios.create ({ baseURL : 'https://axios-app.firebaseio.com', headers: {'Accept': 'application.json'} })
And then we import this file into the form components:
// form.js component
// import from our custom instance import axios from './authAxios'
export default { methods : { onSubmit () { axios.post('/users.json', formData) .then(res => console.log(res)) .catch(error => console.log(error)) } } }
Interceptors
Interceptors helps with cases where the global config or custom instance might be too generic, in the sense that if you set up an header within their objects, it applies to the header of every request within the affected components. Interceptors have the ability to change any object properties on the fly. For instance, we can send a different header (even if we have set one up in the object) based on any condition we choose within the interceptor.
Interceptors can be in the main.js file or a custom instance file. Requests are intercepted after they’ve been sent out and allow us to change how the response is handled.
// Add a request interceptor axios.interceptors.request.use(function (config) { // Do something before request is sent, like we're inserting a timeout for only requests with a particular baseURL if (config.baseURL === 'https://axios-app.firebaseio.com/users.json') { config.timeout = 4000 } else { return config } console.log (config) return config; }, function (error) { // Do something with request error return Promise.reject(error); }); // Add a response interceptor axios.interceptors.response.use(function (response) { // Do something with response data like console.log, change header, or as we did here just added a conditional behaviour, to change the route or pop up an alert box, based on the reponse status if (response.status === 200 || response.status 201) { router.replace('homepage') } else { alert('Unusual behaviour') } console.log(response) return response; }, function (error) { // Do something with response error return Promise.reject(error); });
Interceptors, as the name implies, intercept both requests and responses to act differently based on whatever conditions are provided. For instance, in the request interceptor above, we inserted a conditional timeout only if the requests have a particular baseURL. For the response, we can intercept it and modify what we get back, like change the route or have an alert box, depending on the status code. We can even provide multiple conditions based on different error codes.
Interceptors will prove useful as your project becomes larger and you start to have lots of routes and nested routes all communicating to servers based on different triggers. Beyond the conditions I set above, there are many other situations that can warrant the use of interceptors, based on your project.
Interestingly, we can eject an interceptor to prevent it from having any effect at all. We’ll have to assign the interceptor to a variable and eject it using the appropriately named eject method.
const reqInterceptor = axios.interceptors.request.use(function (config) { // Do something before request is sent, like we're inserting a timeout for only requests with a particular baseURL if (config.baseURL === 'https://axios-app.firebaseio.com/users.json') { config.timeout = 4000 } else { return config } console.log (config) return config; }, function (error) { // Do something with request error return Promise.reject(error); }); // Add a response interceptor const resInterceptor = axios.interceptors.response.use(function (response) { // Do something with response data like console.log, change header, or as we did here just added a conditional behaviour, to change the route or pop up an alert box, based on the reponse status if (response.status === 200 || response.status 201) { router.replace('homepage') } else { alert('Unusual behaviour') } console.log(response) return response; }, function (error) { // Do something with response error return Promise.reject(error); });
axios.interceptors.request.eject(reqInterceptor); axios.interceptors.request.eject(resInterceptor);
Although it’s less commonly used, it’s possible to put and interceptor into a conditional statement or remove one based on some event.
Hopefully this gives you a good idea about the way axios works as well as how it can be used to keep API requests DRY in an application. While we scratched the surface by calling out common use cases and configurations, axis has so many other advantages you can explore in the documentation, including the ability to cancel requests and protect against cross-site request forgery , among other awesome possibilities.
The post Stay DRY Using axios for API Requests appeared first on CSS-Tricks.
Stay DRY Using axios for API Requests published first on https://deskbysnafu.tumblr.com/
0 notes
Text
Stay DRY Using axios for API Requests
HTTP requests are a crucial part of any web application that’s communicating with a back-end server. The front end needs some data, so it asks for it via a network HTTP request (or Ajax, as it tends to be called), and the server returns an answer. Almost every website these days does this in some fashion.
With a larger site, we can expect to see more of this. More data, more APIs, and more special circumstances. As sites grow like this, it is important to stay organized. One classic concept is DRY (short for Don’t Repeat Yourself), which is the process of abstracting code to prevent repeating it over and over. This is ideal because it often allows us to write something once, use it in multiple places, and update in a single place rather than each instance.
We might also reach for libraries to help us. For Ajax, axios is a popular choice. You might already be familiar with it, and even use it for things like independent POST and GET requests while developing.
Installation and the basics
It can be installed using npm (or yarn):
npm install axios
An independent POST request using Axios looks like this:
axios.post('https://axios-app.firebaseio.com/users.json', formData) .then(res => console.log(res)) .catch(error => console.log(error))
Native JavaScript has multiple ways of doing JavaScript too. Notably, fetch(). So why use a library at all? Well, for one, error handling in fetch is pretty wonky. You’ll have a better time with axios right out of the gate with that. If you’d like to see a comparison, we have an article that covers both and an article that talks about the value of abstraction with stuff like this.
Another reason to reach for axios? It gives us more opportunities for DRYness, so let’s look into that.
Global config
We can set up a global configuration (e.g. in our main.js file) that handles all application requests using a standard configuration that is set through a default object that ships with axios.
This object contains:
baseURL: A relative URL that acts as a prefix to all requests, and each request can append the URL
headers: Custom headers that can be set based on the requests
timeout: The point at which the request is aborted, usually measured in milliseconds. The default value is 0, meaning it’s not applicable.
withCredentials: Indicates whether or not cross-site Access-Control requests should be made using credentials. The default is false.
responseType: Indicates the type of data that the server will return, with options including json (default), arraybuffer, document, text, and stream.
responseEncoding: Indicates encoding to use for decoding responses. The default value is utf8.
xsrfCookieName: The name of the cookie to use as a value for XSRF token, the default value is XSRF-TOKEN.
xsrfHeaderName: The name of the HTTP header that carries the XSRF token value. The default value is X-XSRF-TOKEN.
maxContentLength: Defines the max size of the HTTP response content in bytes allowed
maxBodyLength: Defines the max size of the HTTP request content in bytes allowed
Most of time, you’ll only be using baseURL, header, and maybe timeout. The rest of them are less frequently needed as they have smart defaults, but it’s nice to know there are there in case you need to fix up requests.
This is the DRYness at work. For each request, we don’t have to repeat the baseURL of our API or repeat important headers that we might need on every request.
Here’s an example where our API has a base, but it also has multiple different endpoints. First, we set up some defaults:
/ main.js import axios from 'axios';
axios.defaults.baseURL = 'https://axios-app.firebaseio.com' // the prefix of the URL axios.defaults.headers.get['Accept'] = 'application.json' // default header for all get request axios.defaults.headers.post['Accept'] = 'application.json' // default header for all POST request
Then, in a component, we can use axios more succinctly, not needing to set those headers, but still having an opportunity to customize the final URL endpoint:
// form.js component import axios from 'axios';
export default { methods : { onSubmit () { // The URL is now https://axios-app.firebaseio.com/users.json axios.post('/users.json', formData) .then(res => console.log(res)) .catch(error => console.log(error)) } } }
Note: This example is in Vue, but the concept extends to any JavaScript situation.
Custom instance
Setting up a “custom instance” is similar to a global config, but scoped to specified components. So, it’s still a DRY technique, but with hierarchy.
We’ll set up our custom instance in a new file (let’s call it authAxios.js) and import it into the “concern” components.
// authAxios.js import axios from 'axios'
const customInstance = axios.create ({ baseURL : 'https://axios-app.firebaseio.com' }) customInstance.defaults.headers.post['Accept'] = 'application.json'
// Or like this...
const customInstance = axios.create ({ baseURL : 'https://axios-app.firebaseio.com', headers: {'Accept': 'application.json'} })
And then we import this file into the form components:
// form.js component
// import from our custom instance import axios from './authAxios'
export default { methods : { onSubmit () { axios.post('/users.json', formData) .then(res => console.log(res)) .catch(error => console.log(error)) } } }
Interceptors
Interceptors helps with cases where the global config or custom instance might be too generic, in the sense that if you set up an header within their objects, it applies to the header of every request within the affected components. Interceptors have the ability to change any object properties on the fly. For instance, we can send a different header (even if we have set one up in the object) based on any condition we choose within the interceptor.
Interceptors can be in the main.js file or a custom instance file. Requests are intercepted after they’ve been sent out and allow us to change how the response is handled.
// Add a request interceptor axios.interceptors.request.use(function (config) { // Do something before request is sent, like we're inserting a timeout for only requests with a particular baseURL if (config.baseURL === 'https://axios-app.firebaseio.com/users.json') { config.timeout = 4000 } else { return config } console.log (config) return config; }, function (error) { // Do something with request error return Promise.reject(error); }); // Add a response interceptor axios.interceptors.response.use(function (response) { // Do something with response data like console.log, change header, or as we did here just added a conditional behaviour, to change the route or pop up an alert box, based on the reponse status if (response.status === 200 || response.status 201) { router.replace('homepage') } else { alert('Unusual behaviour') } console.log(response) return response; }, function (error) { // Do something with response error return Promise.reject(error); });
Interceptors, as the name implies, intercept both requests and responses to act differently based on whatever conditions are provided. For instance, in the request interceptor above, we inserted a conditional timeout only if the requests have a particular baseURL. For the response, we can intercept it and modify what we get back, like change the route or have an alert box, depending on the status code. We can even provide multiple conditions based on different error codes.
Interceptors will prove useful as your project becomes larger and you start to have lots of routes and nested routes all communicating to servers based on different triggers. Beyond the conditions I set above, there are many other situations that can warrant the use of interceptors, based on your project.
Interestingly, we can eject an interceptor to prevent it from having any effect at all. We’ll have to assign the interceptor to a variable and eject it using the appropriately named eject method.
const reqInterceptor = axios.interceptors.request.use(function (config) { // Do something before request is sent, like we're inserting a timeout for only requests with a particular baseURL if (config.baseURL === 'https://axios-app.firebaseio.com/users.json') { config.timeout = 4000 } else { return config } console.log (config) return config; }, function (error) { // Do something with request error return Promise.reject(error); }); // Add a response interceptor const resInterceptor = axios.interceptors.response.use(function (response) { // Do something with response data like console.log, change header, or as we did here just added a conditional behaviour, to change the route or pop up an alert box, based on the reponse status if (response.status === 200 || response.status 201) { router.replace('homepage') } else { alert('Unusual behaviour') } console.log(response) return response; }, function (error) { // Do something with response error return Promise.reject(error); });
axios.interceptors.request.eject(reqInterceptor); axios.interceptors.request.eject(resInterceptor);
Although it’s less commonly used, it’s possible to put and interceptor into a conditional statement or remove one based on some event.
Hopefully this gives you a good idea about the way axios works as well as how it can be used to keep API requests DRY in an application. While we scratched the surface by calling out common use cases and configurations, axis has so many other advantages you can explore in the documentation, including the ability to cancel requests and protect against cross-site request forgery , among other awesome possibilities.
The post Stay DRY Using axios for API Requests appeared first on CSS-Tricks.
source https://css-tricks.com/stay-dry-using-axios-for-api-requests/
from WordPress https://ift.tt/2Cl7URu via IFTTT
0 notes
Text
How to use Axios with JavaScript
Axios is an open source library that allows us to easily make HTTP requests. It’s effectively just fetch with extra superpowers!
Let’s see this in action by creating a new HTML5 project:
# Create directory with a name of your choosing $ mkdir axios-js && cd axios-js # Create files $ touch index.html app.js # Initialise a new npm project $ npm init -y # Install Axios $ npm i axios -S $ npm i parcel-bundler -D # Open this up in your editor $ code .
🐊 Alligator.io recommends:
ES6 for Everyone → A video course to learn modern JavaScript
ⓘ About this affiliate link
NOTE: Axios can also be added via a CDN like so: <script src="https://unpkg.com/axios/dist/axios.min.js"></script>
As you may be able to see from our npm install calls, we’ll be using Parcel to bundle and serve our code. We can add an npm script for this by heading over to package.json:
{ "scripts": { "dev": "parcel index.html", "build": "parcel build index.html" } }
As we’ll be using async and await inside of our project, we’ll install Babel and the @babel/polyfill package:
$ npm i @babel/core @babel/polyfill
Start your project by running npm run dev in your terminal and navigate to http://localhost:1234/. We can then update index.html with our app.js and some minor semantics:
<!DOCTYPE html> <html lang="en"> <head> <meta charset="UTF-8"> <meta name="viewport" content="width=device-width, initial-scale=1.0"> <meta http-equiv="X-UA-Compatible" content="ie=edge"> <title>Vanilla Axios</title> <style> body { background-color: #673AB7; color: white; } ul { list-style: none; } </style> </head> <body> <div> <h1>Todos</h1> <ul> </ul> </div> <script src="app.js"></script> </body> </html>
GET
Inside of app.js, let’s make a function that allows us to GET Todos from an API. We’ll be using the JSON Placeholder API for our example.
import axios from 'axios'; const BASE_URL = 'https://jsonplaceholder.typicode.com'; const getTodos = async () => { try { const res = await axios.get(`${BASE_URL}/todos`); const todos = res.data; console.log(`GET: Here's the list of todos`, todos); return todos; } catch (e) { console.error(e); } };
Axios almost makes it almost too simple to get data from a server, which is great news for us. Simply pass axios.get the BASE_URL and you’ll get a response object back.
This includes information about our response including things like headers, status, config and most importantly, data.
We can extend our application to now add this data to the DOM:
const createLi = item => { const li = document.createElement('li'); li.appendChild(document.createTextNode(item.title)); return li; }; const addTodosToDOM = todos => { const ul = document.querySelector('ul'); if (Array.isArray(todos) && todos.length > 0) { todos.map(todo => { ul.appendChild(createLi(todo)); }); } else if (todos) { ul.appendChild(createLi(todos)); } }; const main = async () => { addTodosToDOM(await getTodos()); }; main();
POST
We can add Todos to our API by capturing some information about it inside of a form and input:
<div id="new-todos"> <h1>New Todo</h1> <form> <label> Name <input type="text" id="new-todos__name" /> </label> <label> userId <input type="text" id="new-todos__userId" /> </label> <button type="submit">Add</button> </form> </div>
We can then add the Todo by listening for the submit event:
const form = document.querySelector('form'); const formEvent = form.addEventListener('submit', async event => { event.preventDefault(); const title = document.querySelector('#new-todos__title').value; const userId = document.querySelector('#new-todos__userId').value; const todo = { title, userId }; const addedTodo = await addTodo(todo); addTodosToDOM(addedTodo); });
We’ll need to create the addTodo function inside of app.js. The major difference between this and the get example is that we’re adding the todo payload.
export const addTodo = async todo => { try { const res = await axios.post(`${BASE_URL}/todos`, todo); const addedTodo = res.data; console.log(`Added a new Todo!`, addedTodo); return addedTodo; } catch (e) { console.error(e); } };
DELETE
What good is a Todo list if we can’t delete items? Let’s add that functionality. We can create a deleteTodo function inside of app.js:
export const deleteTodo = async id => { try { const res = await axios.delete(`${BASE_URL}/todos/${id}`); console.log(`Deleted Todo ID: `, id); return res.data; } catch (e) { console.error(e); } };
Within our createLi function we can attach an onclick event which handles the removal of our Todo when it’s clicked. The DELETE method requires an id to be passed as a parameter, so we can also add an id to each element at this stage.
const createLi = item => { const li = document.createElement('li'); li.id = item.id; li.appendChild(document.createTextNode(item.title)); // Remove LI on click li.onclick = async e => await removeTodo(e, li); return li; };
Inside of removeLi we can remove the Todo from the DOM and then call deleteTodo with the ID:
const removeTodo = async (e, li) => { e.target.parentElement.removeChild(li); const id = li.id; await deleteTodo(id); };
Summary
This article looked at a few of the key ways to interact with an API using Axios using a very simple Todo application. If you’d like to learn more about Axios, check out the guides on React + Axios and Vue + Axios.
via Alligator.io http://bit.ly/2VzoBNP
0 notes
Text
Building a Vue SPA with Laravel Part 3
News / February 16, 2018
Building a Vue SPA with Laravel Part 3
We will continue building our Vue SPA with Laravel by showing you how to load asynchronous data before the vue-router enters a route.
We left off in Building a Vue SPA With Laravel Part 2 finishing a UsersIndex Vue component which loads users from an API asynchronously. We skimped on building a real API backed by the database and opted for fake data in the API response from Laravel’s factory() method.
If you haven’t read Part 1 and Part 2 of building a Vue SPA with Laravel, I suggest you start with those posts first and then come back. I’ll be waiting for you!
In this tutorial we are also going to swap out our fake /users endpoint with a real one powered by a database. I prefer to use MySQL, but you can use whatever database driver you want!
Our UsersIndex.vue router component is loading the data from the API during the created() lifecycle hook. Here’s what our fetchData() method looks like at the conclusion of Part 2:
created() { this.fetchData(); }, methods: { fetchData() { this.error = this.users = null; this.loading = true; axios .get('/api/users') .then(response => { this.loading = false; this.users = response.data; }).catch(error => { this.loading = false; this.error = error.response.data.message || error.message; }); } }
I promised that I’d show you how to retrieve data from the API before navigating to a component, but before we do that we need to swap our API out for some real data.
Creating a Real Users Endpoint
We are going to create a UsersController from which we return JSON data using Laravel’s new API resources introduced in Laravel 5.5.
Before we create the controller and API resource, let’s first set up a database and seeder to provide some test data for our SPA.
The User Database Seeder
We can create a new users seeder with the make:seeder command:
php artisan make:seeder UsersTableSeeder
The UsersTableSeeder is pretty simple right now—we just create 50 users with a model factory:
<?php use Illuminate\Database\Seeder; class UsersTableSeeder extends Seeder { public function run() { factory(App\User::class, 50)->create(); } }
Next, let’s add the UsersTableSeeder to our database/seeds/DatabaseSeeder.php file:
<?php use Illuminate\Database\Seeder; class DatabaseSeeder extends Seeder { /** * Run the database seeds. * * @return void */ public function run() { $this->call([ UsersTableSeeder::class, ]); } }
We can’t apply this seeder without first creating and configuring a database.
Configuring a Database
It’s time to hook our Vue SPA Laravel application up to a real database. You can use SQLite with a GUI like TablePlus or MySQL. If you’re new to Laravel, you can go through the extensive documentation on getting started with a database.
If you have a local MySQL instance running on your machine, you can create a new database rather quickly from the command line with the following (assuming you don’t have a password for local development):
mysql -u root -e"create database vue_spa;" # or you could prompt for the password with the -p flag mysql -u root -e"create database vue_spa;" -p
Once you have the database, in the .env file configure the DB_DATABASE=vue_spa. If you get stuck, follow the documentation which should make it easy to get your database working.
Once you have the database connection configured, you can migrate your database tables and add seed data. Laravel ships with a Users table migration that we are using to seed data:
# Ensure the database seeders get auto-loaded composer dump-autoload php artisan migrate:fresh --seed
You can also use the separate artisan db:seed command if you wish! That’s it; you should have a database with 50 users that we can query and return via the API.
The Users Controller
If you recall from Part 2, the fake /users endpoint found in the routes/api.php file looks like this:
Route::get('/users', function () { return factory('App\User', 10)->make(); });
Let’s create a controller class, which also gives us the added benefit of being able to use php artisan route:cache in production, which is not possible with closures. We’ll create both the controller and a User API resource class from the command line:
php artisan make:controller Api/UsersController php artisan make:resource UserResource
The first command is adding the User controller in an Api folder at app/Http/Controllers/Api, and the second command adds UserResource to the app/Http/Resources folder.
Here’s the new routes/api.php code for our controller and Api namespace:
Route::namespace('Api')->group(function () { Route::get('/users', 'UsersController@index'); });
The controller is pretty straightforward; we are returning an Eloquent API resource with pagination:
<?php namespace App\Http\Controllers\Api; use App\User; use Illuminate\Http\Request; use App\Http\Controllers\Controller; use App\Http\Resources\UserResource; class UsersController extends Controller { public function index() { return UserResource::collection(User::paginate(10)); } }
Here’s an example of what the JSON response will look like once we wire up the UserResource with API format:
{ "data":[ { "name":"Francis Marquardt", "email":"[email protected]" }, { "name":"Dr. Florine Beatty", "email":"[email protected]" }, ... ], "links":{ "first":"http:\/\/vue-router.test\/api\/users?page=1", "last":"http:\/\/vue-router.test\/api\/users?page=5", "prev":null, "next":"http:\/\/vue-router.test\/api\/users?page=2" }, "meta":{ "current_page":1, "from":1, "last_page":5, "path":"http:\/\/vue-router.test\/api\/users", "per_page":10, "to":10, "total":50 } }
It’s fantastic that Laravel provides us with the pagination data and adds the users to a data key automatically!
Here’s the UserResource class:
<?php namespace App\Http\Resources; use Illuminate\Http\Resources\Json\Resource; class UserResource extends Resource { /** * Transform the resource into an array. * * @param \Illuminate\Http\Request $request * @return array */ public function toArray($request) { return [ 'name' => $this->name, 'email' => $this->email, ]; } }
The UserResource transforms each User model in the collection to an array and provides the UserResource::collection() method to transform a collection of users into a JSON format.
At this point, you should have a working /api/users endpoint that we can use with our SPA, but if you are following along, you will notice that our new response format breaks the component.
Fixing the UsersIndex Component
We can quickly get our UsersIndex.vue Component working again by adjusting the then() call to reference the data key where our user data now lives. It might look at little funky at first, but response.data is the response object, so the user data can be set like the following:
this.users = response.data.data;
Here’s the adjusted fetchData() method that works with our new API:
fetchData() { this.error = this.users = null; this.loading = true; axios .get('/api/users') .then(response => { this.loading = false; this.users = response.data.data; }).catch(error => { this.loading = false; this.error = error.response.data.message || error.message; }); }
Fetching Data Before Navigation
Our component is working with our new API, and it’s an excellent time to demonstrate how you might fetch users before navigation to the component occurs.
With this approach, we fetch the data and then navigate to the new route. We can accomplish this by using the beforeRouteEnter guard on the incoming component. An example from the vue-router documentation looks like this:
beforeRouteEnter (to, from, next) { getPost(to.params.id, (err, post) => { next(vm => vm.setData(err, post)) }) },
Check the documentation for the complete example, but suffice it to say that we will asynchronously get the user data, once complete, and only after completion, we trigger next() and set the data on our component (the vm variable).
Here’s what a getUsers function might look like to asynchronously get users from the API and then trigger a callback into the component:
const getUsers = (page, callback) => { const params = { page }; axios .get('/api/users', { params }) .then(response => { callback(null, response.data); }).catch(error => { callback(error, error.response.data); }); };
Note that the method doesn’t return a Promise, but instead triggers a callback on completion or failure. The callback passes to arguments, an error, and the response from the API call.
Our getUsers() method accepts a page variable which ends up in the request as a query string param. If it’s null (no page passed in the route), then the API will automatically assume page=1.
The last thing I’ll point out is the const params value. It will effectively look like this:
{ params: { page: 1 } }
And here’s how our beforeRouteEnter guard uses the getUsers function to get async data and then set it on the component while calling next():
beforeRouteEnter (to, from, next) { const params = { page: to.query.page }; getUsers(to.query.page, (err, data) => { next(vm => vm.setData(err, data)); }); },
This piece is the callback argument in the getUses() call after the data is returned from the API:
(err, data) => { next(vm => vm.setData(err, data)); }
Which is then called like this in getUsers() on a successful response from the API:
callback(null, response.data);
The beforeRouteUpdate
When the component is in a rendered state already, and the route changes, the beforeRouteUpdate gets called, and Vue reuses the component in the new route. For example, when our users navigate from /users?page=2 to /users?page=3.
The beforeRouteUpdate call is similar to beforeRouteEnter. However, the former has access to this on the component, so the style is slightly different:
// when route changes and this component is already rendered, // the logic will be slightly different. beforeRouteUpdate (to, from, next) { this.users = this.links = this.meta = null getUsers(to.query.page, (err, data) => { this.setData(err, data); next(); }); },
Since the component is in a rendered state, we need to reset a few data properties before getting the next set of users from the API. We have access to the component. Therefore, we can call this.setData() (which I have yet to show you) first, and then call next() without a callback.
Finally, here’s the setData method on the UsersIndex component:
setData(err, { data: users, links, meta }) { if (err) { this.error = err.toString(); } else { this.users = users; this.links = links; this.meta = meta; } },
The setData() method uses object destructuring to get the data, links and meta keys coming from the API response. We use the data: users to assign data to the new variable name users for clarity.
Tying the UsersIndex All Together
I’ve shown you pieces of the UsersIndex component, and we are ready to tie it all together, and sprinkle on some very basic pagination. This tutorial isn’t showing you how to build pagination, so you can find (or create) fancy pagination of your own!
Pagination is an excellent way to show you how to navigate around an SPA with vue-router programmatically.
Here’s the full component with our new hooks and methods to get async data using router hooks:
<template> <div class="users"> <div v-if="error" class="error"> <p></p> </div> <ul v-if="users"> <li v-for="{ id, name, email } in users"> <strong>Name:</strong> , <strong>Email:</strong> </li> </ul> <div class="pagination"> <button :disabled="! prevPage" @click.prevent="goToPrev">Previous</button> <button :disabled="! nextPage" @click.prevent="goToNext">Next</button> </div> </div> </template> <script> import axios from 'axios'; const getUsers = (page, callback) => { const params = { page }; axios .get('/api/users', { params }) .then(response => { callback(null, response.data); }).catch(error => { callback(error, error.response.data); }); }; export default { data() { return { users: null, meta: null, links: { first: null, last: null, next: null, prev: null, }, error: null, }; }, computed: { nextPage() { if (! this.meta || this.meta.current_page === this.meta.last_page) { return; } return this.meta.current_page + 1; }, prevPage() { if (! this.meta || this.meta.current_page === 1) { return; } return this.meta.current_page - 1; }, paginatonCount() { if (! this.meta) { return; } const { current_page, last_page } = this.meta; return `${current_page} of ${last_page}`; }, }, beforeRouteEnter (to, from, next) { getUsers(to.query.page, (err, data) => { next(vm => vm.setData(err, data)); }); }, // when route changes and this component is already rendered, // the logic will be slightly different. beforeRouteUpdate (to, from, next) { this.users = this.links = this.meta = null getUsers(to.query.page, (err, data) => { this.setData(err, data); next(); }); }, methods: { goToNext() { this.$router.push({ query: { page: this.nextPage, }, }); }, goToPrev() { this.$router.push({ name: 'users.index', query: { page: this.prevPage, } }); }, setData(err, { data: users, links, meta }) { if (err) { this.error = err.toString(); } else { this.users = users; this.links = links; this.meta = meta; } }, } } </script>
If it’s easier to digest, here’s the UsersIndex.vue as a GitHub Gist.
There are quite a few new things here, so I’ll point out some of the more important points. The goToNext() and goToPrev() methods demonstrate how you navigate with vue-router using this.$router.push:
this.$router.push({ query: { page: `${this.nextPage}`, }, });
We are pushing a new page to the query string which triggers beforeRouteUpdate. I also want to point out that I’m showing you a <button> element for the previous and next actions, primarily to demonstrate programmatically navigating with vue-router, and you would likely use <router-link /> to automatically navigate between paginated routes.
I have introduced three computed properties (nextPage, prevPage, and paginatonCount) to determine the next and previous page numbers, and a paginatonCount to show a visual count of the current page number and the total page count.
The next and previous buttons use the computed properties to determine if they should be disabled, and the “goTo” methods use these computed properties to push the page query string param to the next or previous page. The buttons are disabled when a next or previous page is null at the boundaries of the first and last pages.
There’s probably a bit of redundancy in the code, but this component illustrates using vue-router for fetching data before entering a route!
Don’t forget to make sure you build the latest version of your JavaScript by running Laravel Mix:
# NPM npm run dev # Watch to update automatically while developing npm run watch # Yarn yarn dev # Watch to update automatically while developing yarn watch
Finally, here’s what our SPA looks like after we update the complete UsersIndex.vue component:
What’s Next
We now have a working API with real data from a database, and a simple paginated component which uses Laravel’s API model resources on the backend for simple pagination links and wrapping the data in a data key.
Next, we will work on creating, editing, and deleting users. A /users resource would be locked down in a real application, but for now, we are just building CRUD functionality to learn how to work with vue-router to navigate and pull in data asynchronously.
We could also work on abstracting the axios client code out of the component, but for now, it’s simple, so we’ll leave it in the component until Part 4. Once we add additional API features, we’ll want to create a dedicated module for our HTTP client.
via Laravel News http://ift.tt/2BxHnhd
0 notes
Text
Rapid prototyping with Vue.js
When I started at codecentric, I had no clue about frontend frameworks. Sure, I knew my HTML and CSS and I did some dynamic pages with PHP, but who didn’t? The first frontend-only framework I seriously worked with was AngularJS. I had a hard time getting into it, which was mostly based on the fact that it was ill-used in our project setup. Instead of separate modules for different parts of the software, we had one giant controller that only got more and more code branches for all the little specialities that were necessary for our business cases.
After a while, our team broke up this massive pile of code. I was eager to help and got a better understanding of JavaScript and AngularJS every day. Today I am pretty familiar with AngularJS projects. Although there is one thing that’s always bothered me. Setting up a small Angular project, for example if you want to quickly try out an idea, can be pretty tedious. I took a look at other frameworks (Angular2, React) in hope that they would be more easy to start a project with, but there you mostly start with an npm/webpack/whatever setup, which is often just totally overweight.
Then I came across Vue. And I really like how lightweight it can be. In this tutorial, I want to show you how quickly you can set up a dynamic webpage, even with REST functionality. A little bit of basic JavaScript knowledge is helpful here. You should also be familiar with the usage of your browser’s developer tools.
If you want to program along, create an index.html and paste this snippet. In the snippet I added some css styling, so the whole thing looks a little bit nicer.
Let’s start with a simple form:
Zip: Loading...
City Matching City: Insert zip to display matching city
This should render you the following form:
The form should take a valid (in this case German) ZIP and show the matching city. Now let’s init Vue.js. Add a link to vue.js to the header:
Then add a script snippet before the closing html tag where you init Vue:
new Vue({ el: '#zip-loader', data: { city: 'Insert zip to display matching city' } });
We don’t have an Element ‘#zip-loader’ yet, so create a div around the existing form:
…
Replace the text ‘Insert zip to display matching city’ with , so that it looks like this:
Matching City:
Reload the file. It should look the same. Only the text is now taken out of the data part of the Vue instance we created. Try changing the text in the city field. It should change in your form. If something’s wrong, check your browser console for errors. Vue is very verbose and it’s often easy to spot the mistakes.
Let’s register the user’s input. Add a ZIP field to the data section of your vue instance and set it to be an empty string:
data: { zip: '', .. }
Bind the new field to the input field in the form. Now everything the users enter here will be directly bound to the ZIP field in the data section of our Vue instance.
Now let’s add a method that is called when a letter is entered:
Add a methods block in your Vue instance and define the method ‘parseZip’ in it. Let’s just log the value of the ZIP field.
methods:{ parseZip: function(){ console.log(this.zip); } }
Now if you enter something in the input field, your browser should log it to the console. By the way, this references your Vue instance.
Now that we get user input, we need to do something with it. We want to load a matching city for an entered ZIP. Since we don’t have a backend, we use a public API for this. http://ift.tt/1EXLE9c offers a very easy to use api. If you call http://ift.tt/2Eb9i4T (the ZIP of the city Solingen in Germany), you get a nice JSON object that holds all the necessary information:
{ "post code": "42697", "country": "Germany", "country abbreviation": "DE", "places": [{ "place name": "Solingen", "longitude": "51.1611", "state": "Nordrhein-Westfalen", "state abbreviation": "NW", "latitude": "05122" }] }
Vue cannot make rest calls. So we need another library for this. I use axios, but you can use any REST library you like. To embed it, just add the JavaScript source to the header:
This enables you to make a GET call in the parseZip method:
parseZip: function(){ axios.get('http://ift.tt/2Eb9i4T') .then(function(response){ console.log(response.data); }) }
Instead of logging the content of the ZIP field, we now make a rest call every time the user enters a key. The resulting data is then logged to the browser console.
Now modify the REST URL to take the ZIP from the data object of our Vue instance:
axios.get(`http://ift.tt/2E9N1UP}`)
Note that I changed the single quotes to backticks here, so I can use template strings.
Since ZIP codes in Germany are generally 5 digits long, add a safeguard around the method, so that the API is not called with a definitely invalid ZIP. Also, change the log function to log the retrieved city. Take a look at the JSON object again, to better understand the syntax I used here.
if (this.zip.length === 5) { axios.get(`http://ift.tt/2E9N1UP}`).then(function(response) { console.log(response.data.places[0]['place name']); }) }
To show the retrieved city on the website, just assign it to the data object. Note: We need to assign the Vue instance to a variable first, because the callback function of the rest call creates a new scope where this doesn’t reference the Vue instance any more.
const myApp = this; if (this.zip.length === 5) { axios.get(`http://ift.tt/2E9N1UP}`) .then(function (response) { myApp.city = response.data.places[0]['place name']; }) }
If you now enter a valid ZIP into the input form, it should show the name of the matching city.
Now our basic functionality is done. Let’s finish up with a little error handling and a loading message.
To show an error message, add a catch block to the get method.
axios.get(`http://ift.tt/2E9N1UP}`) .then(function (response) { myApp.city = response.data.places[0]['place name']; }) .catch(function(){ myApp.city = 'Not a valid zip code'; })
To show a loading message, we need a little additional CSS:
… .visible { display: inline; } … <style>
Add a loading flag to the data section:
data: { … loading: false }
Set the flag to true before the GET call:
… myApp.loading = true; axios.get(`http://ift.tt/2E9N1UP}`) …
And set it to false when loading is done:
.then(function (response) { myApp.city = response.data.places[0]['place name']; myApp.loading = false; }) .catch(function () { myApp.city = 'Not a valid zip code'; myApp.loading = false; })
Now all there is left is changing the CSS class of the Loading... text according to the flag.
Loading...
That’s it. We’re done. We created a dynamic, RESTful web page without any build or packaging tools. This shows why Vue is a great framework if you want to try out something very quick.
You can look up the final code at http://ift.tt/2EZcx0l or play with it in this codepen.
See the Pen Rapid protoyping with vue by Andreas Houben (@ahouben) on CodePen.
The post Rapid prototyping with Vue.js appeared first on codecentric AG Blog.
Rapid prototyping with Vue.js published first on http://ift.tt/2fA8nUr
0 notes